3D printing is cool, but have you tried 2.5D printing?

20190617 2-5D Print Thin Wall 3D

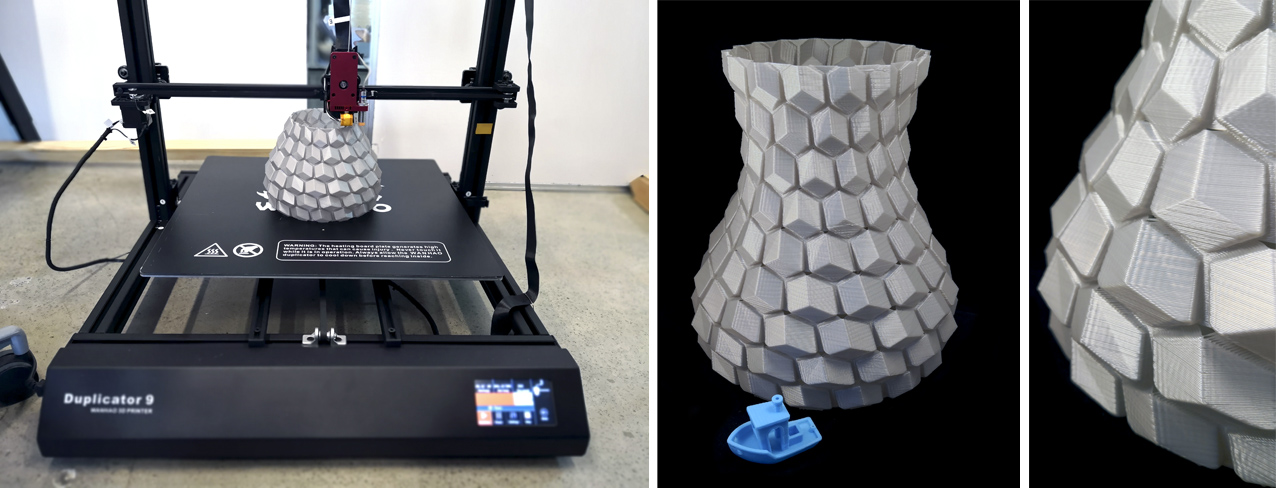
Over the last 18 months or so I’ve been stripping back FDM 3D printing to its basics, experimenting with a variety of materials, composites and patterns designed to be printed flat and assembled into more complex 3D forms. Why?

Well there are many reasons why you might want to use a 3D printer to create relatively flat forms: firstly, as anyone who has used a 3D printer would know, the process is extremely slow. The less vertical height you need to print the faster your part will be completed (generally). Secondly, most accessible 3D printers have a very small build volume, and often you want to 3D print something huge. By 3D printing a lot of smaller, flat parts and assembling them later, you can create a large 3D printed object on a small machine (for example check out the full length inBloom Dress by XYZ Workshop which was assembled out of 191 smaller panels).

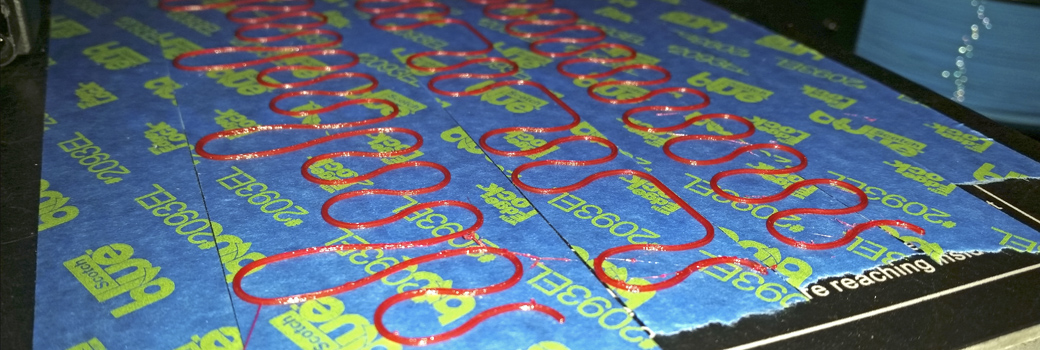
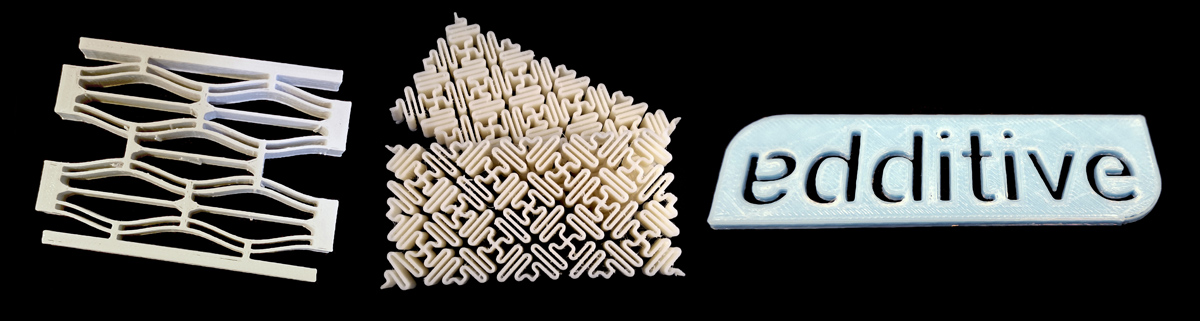
This type of 3D printing has actually been called 2.5D printing, since it is essentially the production of 2D geometry that is extruded in a single direction. No fancy lattice structures or compound curves here! Below are some examples I’ve printed over the years, and while some of them like the mesostructure (centre) may look complex, the geometry can be described by a single 2D drawing and extrusion (Z) dimension.

20190617 2-5D Print Examples

What I’ve learned is that when you are 2.5D printing often thin geometries, optimising the dimensions of the geometry for the specific capabilities of your FDM machine are critical. In fact, just a 0.1mm change in the thickness of a wall can reduce your print time by ~50%, which is a huge time saving. Knowing what these “magic” wall thickness settings are is powerful, and also very simple when you understand the logic.

This information has now been published in a book chapter titled “Designing Thin 2.5D Parts Optimized for Fused Deposition Modeling,” and provides several equations you can use to quickly calculate the optimum dimensions you should use if you want to 2.5D print (or even 3D print) as quickly as possible with maximum accuracy. Below is a visual graph that can be used to select the optimum wall thickness settings when 3D printing with a 0.4mm nozzle, and also shows the effect STL resolution can have. Full details about this graph can be found in the book, however the short version is that you want to be designing thin wall features using dimensions that fall inside the black boxed (or dashed) regions. So, for example if you will be using a 0.8mm printed wall thickness (representing 2×0.4mm extrusions in your slicer), the optimum dimensions to design with in CAD are 0.5-0.8mm, 1.3-1.6mm, or 2.0-2.3mm. Anything outside of these dimensions will require some level of infill structure which takes longer to print, and can result in a more messy part.

20190617 3D Print Thin Wall

For a part similar to the mesostructure earlier, we calculated that simply adding 0.1mm of thickness to the design from 1.2mmm up to 1.3mm would decrease print time by 38% – yes, it sounds counter-intuitive, but adding material can actually reduce print time!

Designing for additive manufacturing (DfAM) is a very important research area, and it is knowledge like this that I hope can be implemented by designers, manufacturers and others involved in 3D printing. If you want to learn more about 2.5D printing, and the equations you can use to calculate the “optimized zones” for your own 3D printer, please check out my chapter which can be purchased with a 40% discount using my author code “IGI40,” or if you are at a university you may find you already have access through your library subscriptions.

Happy 2.5D printing.

– Posted by James Novak

3D Printed Chainmail: Size XL

20181030_3D Print Chainmail

If you’re into 3D printing like me, chances are you’ve already 3D printed chainmail and been excited by the ability to produce something that is made of multiple parts already assembled and ready to go. If you’re new to 3D printing, what you might not realise is that because you are printing objects in small layer increments, you can print these layers in such a way that different pieces become trapped within each other as the print progresses, permanently assembling them together. This means that something like chainmail, which has been hand assembled for thousands of years one link at a time, can now be printed with all the links in place.

One of the most popular examples in recent years has been from well known designer Agustin Flowalistik, whose unique design of chainmail has been downloaded over 100k times already on Thingiverse! Click here to download the file for yourself and add to this growing number. After one of my previous posts about the new Wanhao Duplicator D9/500 printer, I wanted to see how it would handle the intricate geometry, however, at 200% the scale. Go big or go home!

Well, as you can see from the photos it worked quite nicely. With the large 0.8mm nozzle the layers certainly look rough and messy – this print isn’t going to win any awards for being pretty. But it worked, and on this sketchy 3D printer that’s the most important thing at the moment. One of the nicest things was peeling it off the magnetic flexible build plate of the D9, which you can see in the first picture above – no hacking away with a spatula which is one of the positives of the printer. The links freely move and because of the large size, the chainmail has quite an industrial feel about it. Very satisfying.

So I think I can chalk this one up as a win on the Wanhao D9, which I think brings my score up to about 2 wins, and too many failures to count… Not great but after a firmware update I hope there will be some more wins to come.

– Posted by James Novak

First 3D Print with the Wanhao Duplicator D9/500

IMG_20180917_Webcam 3D Print Mount

If you have followed my blog for any length of time, you’ve probably noticed I’m quite a big fan of the Wanhao 3D printers – they’re cheap, reliable, upgradable, and just good value for money. Even my Cocoon Create from Aldi is actually just a Wanhao in disguise! Recently Wanhao released the Duplicator D9/500, which has an incredible 500x500x500mm build volume. Yes, you read that right, those numbers are not a typo! The picture above doesn’t do it justice, this is a big unit that currently we can only store and run on the floor until we can free up a large desk. Manoeuvring this thing is definitely a 2 person job!

Before I get into the details of the machine and my first experiences, the printed vase pictured above is the first successful print, which is the Curved Honeycomb Vase (free on Thingiverse) printed at 200% scale. Printed in vase mode (aka “spiralise” in Cura) with a 0.8mm nozzle, this print took approximately 6 hours to complete. A great design in itself, and very cool at this large size.

However, it certainly hasn’t all been smooth sailing with this printer. First, there were some lengthy delays from Wanhao between when we placed the order and finally received the machine – apparently some manufacturing and quality control issues, and Wanhao may have released the machine a bit too early to market. In total we waited several months, however, they may be much faster now that issues seem to be resolved. The second big issue we faced was assembly – the supplied instructions weren’t particularly useful or even relevant, with some of the components no longer supplied with the printer – it seems that the initial release included large brackets to help stabilise the frame and some other details in the instructions, so we were left feeling like we were missing some parts. Apparently we are not, although we still haven’t figured out some of the cable management issues and have had to hack together a temporary solution for now.

Another challenge with assembly was in constructing the frame; obviously at such a large size the frame wasn’t pre-assembled like the smaller Duplicator 3, and the frame also uses extruded aluminium rather than folded sheet metal. Squaring all of these extrusions is not simple, and some initial issues when running the machine were related to having one of the vertical frame pieces lightly twisted. Some better alignment details are definitely needed.

The final issue that we’ve been experiencing is in the auto-levelling sensor, which was not installed at the correct height in the factory and required a lot of manual adjustment (we had the nozzle collide with the bed several times when first running it). However, even with this, the machine doesn’t really seem to adjust the prints for any levelling issues; our first prints across the bed revealed a number of areas where the bed was slightly warped, which were not being corrected by the auto-level feature, so we are currently manually doing adjustments for now. And we have found the central area of the bed is OK, so the vase printed really well.

So overall I would have to recommend that anyone considering this printer hold off for at least a few more months, there are just too many issues for anyone without a lot of experience calibrating 3D printers, and without the time to really get in and troubleshoot issues. Last time I searched on YouTube it seems others have also come to a similar conclusion. I think with time this will be a great 3D printer, we’re certainly going to keep learning more about it, but this seems like a case of a manufacturer rushing to market without properly testing and perfecting their equipment. Unfortunately, an all too common story in the 3D printing world.

Make sure you follow my blog and social media accounts to keep up to date with ongoing test prints and posts about the Wanhao Duplicator D9/500. And please share your own experiences in the comments section so we can all learn from each other 🙂

– Posted by James Novak

*UPDATE 14/1/2019 Recently I have updated the firmware of the printer to see if that would improve performance of the machine. I recommend this as a priority for anyone with a D9, it could fix some of the issues you may be experiencing as there are probably several different versions of firmware out there now depending when you purchased your printer. While I haven’t noticed a difference with the levelling issues, it’s always worth running the latest firmware to fix any other potential issues. This video tutorial is excellent, I followed it exactly and managed to update both the LCD display and motherboard to version 0.164(B).

For now I’ve manually adjusted the levelling sensor so that in some areas the nozzle is lower than it should be, pushing into the print surface. This makes other areas of the warped plate the correct height, and after a few layers seems to level things off and be printing OK. Not great, but working for now.

Ninjaflex Part 3 – Flexion Extruder Upgrade

20180515_Flexion Wanhao

This is the third post in a series about 3D printing with Ninjaflex, which initially began using the stock standard extruder on a Wanhao Duplicator i3 (click here to start at the beginning), before a 3D printed modification was trialled (click here for post 2), and now here we are with a completely upgraded extruder specifically for printing with soft materials.

Pictured above you can see some fancy red anodised components and exposed gears – this is the Flexion HT Extruder, a relatively expensive upgrade (US$179) which is about half the cost of the entire printer itself. It replaces the entire core of a standard single extruder; all that remains from the original is the stepper motor and cooling fans. So why upgrade?

Well as the previous posts discovered, the highly flexible nature of Ninjaflex (shore hardness of 85A) meant that it was difficult for the standard extruder to force down through the hotend and out the nozzle. Imagine taking a length of soft liquorice and trying to push it through a hole that is smaller than the liquorice diameter! As a result, after a few minutes of printing, it was common for the filament to begin looping out the back of the extruder. The Flexion extruder has much tighter tolerances around the filament the entire length it travels, so there is nowhere for the filament to go except down. Also, it has adjustable pressure using the round dial you can see with the knurled detail in the photo above – this means you can apply more force on the soft filament to maintain a strong grip against the stepper motor gear. By rotating the dial, you can quickly scale the pressure back when you change to a rigid filament like PLA, with 4 levels of variation possible and a grub screw to really dial in each setting. The design is completely open, (when it was assembled I initially thought something was missing!), which means you can see the filament and gears, which is great for maintenance and adjustment. And while I haven’t tried yet, according to the Flexion website the nozzle can handle higher temperatures than a standard extruder, up to 290°C, which is great for plastics like nylon and polycarbonate.

The photo at the top right is one of the first 3D prints done to test the abilities of the extruder, taking approximately 4 hours. It looks good from a distance, although there are some small gaps where we started with too much retraction and not enough flow – at this point we are still experimenting with settings to get the best results, currently trying 107% flow, 40mm/s print speed and 1mm retraction. If you are using a Flexion for Ninjaflex and have some reliable settings, I’d love you to post a comment and share them!

– Posted by James Novak

Ninjaflex Extruder Mod – Fail

20180409_Ninjaflex Mod

This is a short little update following on from my last post attempting to 3D print with Ninjaflex filament (soft TPU):

After limited success using the stock extruder on a Wanhao Duplicator i3, I found a 3D printable Extruder Drive Block on Thingiverse to supposedly help stop the filament from finding its way out out the back rather than being forced down into the nozzle. Well, as you can see from the photos, it looks like it fits quite well, although I did have to slice and file a few areas to fit properly – most notably around the shaft of the stepper motor which was far too tight and stopped it from turning, and the wheel that pushes the filament against the stepper gear which was blocked from putting any force against the filament so did not drive it down into the nozzle. Admittedly, the file on Thingiverse was designed for the Duplicator 4, so it was a bit of a long shot to work with the i3.

So back to the drawing board I’m afraid for Ninjaflex printing – perhaps time to upgrade to a Flexion extruder, or look at some other TPU materials that might be slightly stiffer and more suitable for this basic extruder. Flexible PLA looks interesting. If you’ve had any successes 3D printing with Ninjaflex on a printer like the Duplicator i3, leave me a comment 🙂

– Posted by James Novak

3D Printed Ninjaflex – First Test

20180406_Ninjaflex Wanhao

I’m sure if you’ve been 3D printing for even a short time, you’ve heard of Ninjaflex – a brand of flexible filament for your FDM printer that has rubber-like properties, rather than the usual rigid plastic parts that are more common with ABS or PLA filaments. While I’ve known about them for many years, I’ve never risked clogging my printer after hearing some bad experiences with these softer materials. Until this week!

I’m currently working with fashion postdoctoral researcher Mark Liu, who purchased a Wanhao Duplicator i3 v2.1 for some of our research – not coincidentally, it’s identical to my home Cocoon Create 3D printer. We decided to give the Ninjaflex a go to see if it would print, and if so, what sort of quality we could get since the printer and replacement parts are cheap if we really screwed up! Photographed above is one of our first successful prints, although the truth is we had quite a few failed attempts getting to this point as we experimented with settings and carefully watched each print. The primary settings we are using for these first tests (based off the recommended settings for Ninjaflex which are available in the Printing Guidelines) are:

  • Extruder Temperature: 230°C
  • Build Plate Temperature: 40°C
  • Print Speed: 15mm/s
  • Layer height: 0.2mm
  • Retraction: 5mm (I think this is too much and we will try 0mm or 1mm)

These may not be perfect yet, and I’m keen for anyone’s feedback on what’s led to more successful prints with these soft filaments. The main thing we’ve noticed is that the soft filament is challenging for the extruder to push down into the nozzle and force out the tip – it is quite common for the nozzle to clog and filament to keep feeding through until it comes out the back of the extruder. Luckily nothing has jammed up yet, you can pull the filament back up out of the extruder and try again. With a bit of a search online, it seems that some 3D printable parts may solve this problem, in particular this modified Extruder Drive Block available on Thingiverse which closes the opening where the filament likes to escape, and will hopefully better force it down through the nozzle. The video below from Wanhao USA helps highlight the problem, and how this 3D printed part can fix it.

It’s early days with this filament, and I know the stock extruder of the Duplicator i3 is really not optimised for this type of material. But it can be done, and I’m sure with some tweaking can be made more reliable. Stay tuned as I am currently printing the new block to install on the Duplicator in the coming days, and will report back with results.

– Posted by James Novak

3D Printed Kobayashi Fidget Cube

20180115_Fidget Cube 3D

One of the great opportunities presented by 3D printing is to print multiple parts as a single object, and have them move afterwards as a complete assembly. There are many great examples, and this Kobayashi Fidget Cube has been on my “to-print list” for some time now. The file is freely available on Thingiverse, and it is pretty awesome!

The photos above give some idea of how it works; a series of cubes that are linked, allowing them to rotate around through a series of positions as you fold and open sections of the object. However the video below (not my own) shows exactly how it works, and is basically a form of fidget device that is currently a popular trend.

As well as being a fun object, it is a great test of your printer’s accuracy and settings, and I must admit my Cocoon Create only had average results. The cube works, but some of the movements are much stiffer than the video. This is probably to do with my settings, I was a little impatient in printing so did not optimise as much as necessary things like layer thickness (used 0.2mm and should’ve tried 0.1mm) and printing speed (50mm/s instead of perhaps 30mm/s or less). I also had to use a knife to slice some of the bottom layers where the cubes had fused together on the print plate. Not a bad first effort, but I might try printing again soon to get a really smooth operating fidget cube.

– Posted by James Novak

Thermoforming 3D Prints

20171113_Thermoform 3D Print

Sorry for the blogging silence, this is the longest break I’ve had since starting a number of years ago. Long story short I’ve made a big move recently for work and am only just starting to get back into printing and making new projects. If you follow my social media, you’ve probably noticed some new things starting!

One of the projects I’ve wanted to play with since previously building the InMoov robot arm is the Enabling the Future prosthetics (aka. e-NABLE). This week I 3D printed and built most of the Phoenix v2 hand, which of course is open source and free to download. A really inspiring company, and a vastly more simple design compared to the electronic InMoov! Some of the pieces, which I printed on an UP Mini 2 in ABS plastic, can be seen above. I’ll post full details once I get it up and running, just waiting on some elastics for the fingers. The gauntlet piece, which attaches to the users forearm, is printed in a flat position and then bent into a C shape afterwards. This is a really clever idea for providing the strongest functional part with optimal layer orientation. But how do you bend a 3D print?

Well the instructions from e-NABLE require dipping the piece in boiling water for a few seconds to make it pliable – if you 3D print in PLA, which has a lower melting temperature than ABS. Check out the video here. However ABS is not really going to be affected by boiling water, and just to make sure I did try this technique with my first print. It did get a bit of a bend, but mostly a snap!

For print #2 I instead found myself a strip heater in the workshop, which is perfect for heating a nice clean line and normally used to bend acrylic sheets. A few seconds on each side of the print and it bent perfectly without de-lamination or splitting, and was easy to re-heat to make small adjustments to fit with the hand print. This is a technique I’d never thought of using, but has really given me a lot of ideas for creating 3D prints which are post-processed like this into a stronger shape than if they were 3D printed in their final more complex form. I think some of the simple enclosures I’ve made in the past could be much stronger if considered more like a sheet-metal part, although then this begs the question why not just laser cut the design? Well in the case of this e-NABLE prosthetic, there are some 3D details for snapping in other pieces, which could not be done using a 2D process like laser cutting. This would be important to consider if using this process with 3D printing, but it’s certainly an interesting technique worth further experimentation.

If you’ve done something like this yourself, or have ideas for thermoforming a 3D print, leave me a comment.

– Posted by James Novak

Moreton Technology Alliance

2017 Moreton Technology Alliance

Last week I teamed up with fellow Advance Queensland Digital Champion  (AQDC) and resident of Moreton Bay, Kate vanderVoort, to discuss the latest digital trends in social media and 3D printing with local businesses in our area. This was hosted by the newly formed Moreton Technology Alliance (MTA), a group of local business owners who are passionate about the region and driving innovation here.

Having been an AQDC for a couple of years now, it was great to team up with newbie to the program Kate, and deliver our insights into what may at first seem like 2 different topics. Kate began by sharing her experience with helping businesses engage with their customers through social media, and how businesses that do this well are finding that their communities of followers begin to act as customer service agents and brand ambassadors, solving fellow customer problems using the immediacy of social media. In Kate’s words, it’s a good problem to have – until your employees start feeling like their jobs are in jeopardy!

This idea of building online communities linked well to my later discussion around Intellectual Property (IP) and how online communities of designers like myself are tapping into the growing libraries of files on websites like Thingiverse and Pinshape to replace broken products, upgrade them, or modify them to perform new functions, sharing our designs for free, or for small payments just like buying a song on iTunes.

20170420_3D Print GoPro Mount

I used the example of GoPro mounts which retail at $29AUD for a pack of 6 genuine mounts, or I can 3D print 6 for $1 in material cost (pictured above from Thingiverse). Sure it’s not quite as perfectly fitting, and the material might break, but I could print 174 mounts for the same cost as 6 genuine mounts – essentially a lifetime supply from my own desktop factory. And this is just from a $400 machine, what if I have a better machine or material?

How do businesses deal with this? Will they be forever chasing people around the world with cease and desist letters (lawyers would be rubbing their hands together!)? Or will businesses shift their thinking and embrace this change, in the same way Hasbro’s My Little Pony has become an online community through Shapeways, where children and adults alike are encouraged to design and sell their own My Little Pony creations?

I certainly don’t profess to have the answers (in short I’m not a big believer of IP even without the 3D printing aspect), however the point of this example, along with examples of projects happening from a variety of industries embracing 3D printing, was to inspire the audience at this MTA event, and encourage further discussion. Which I believe it did given the questions from members afterwards, and realisation that this technology really will affect anyone developing physical products in some way or another.

We also discussed opportunities for businesses to collaborate with universities in order to develop research programs into technologies like 3D printing, with the Australian Government recently changing funding models for universities to emphasise greater links with industry, and grants announced for SME’s to fund innovation in partnership with universities and researchers. Follow the links to find out more information.

Thanks to MTA for inviting me to speak, I hope to be fielding a few questions in the near future from businesses who have been inspired to take the 3D printing plunge!

– Posted by James Novak

Is That A Clogged Nozzle, or…

20170413_3D Nozzle Clog

No it’s just a clogged 3D printer nozzle, thanks for asking!

2017 seems to be my year for repairs on the Cocoon Create 3D printer, it was only a few months ago I wrote a big post about repairing and replacing the PTFE tube after it got seriously clogged. I did some research and found out exactly what the tube is for, and bought a roll of spare tube for future repairs (click here to read more).

Lucky I did! This seems to be the same sort of problem, however instead of the PTFE tube just getting clogged, when I opened up the nozzle the tube had become melted and broke off inside, completely stuck as you can see in the photo. I wonder if the spare PTFE tube I had installed was made from dodgy materials, allowing it to melt? Or maybe the ABS filament had just found a way around the outside of the tube and caused it to clog. Either way it’s getting a bit frustrating to have the same issue.

Luckily this wasn’t too difficult to fix (although I did jump straight on Ebay and buy a couple of spare brass nozzles – just search for RepRap MK10 0.4mm nozzle since the Cocoon Create is based on the RepRap Prusa i3). Using a drill and holding the nozzle with some pliers, I gradually worked my way up from a 2mm to 4mm diameter, clearing out the clogged material. 4mm is almost exactly the same as the internal nozzle diameter, so it cleared everything out nicely.

With some new PTFE tube installed, I’m back up and running again and the first print is coming out nicely (stay tuned to see what it is). Let’s see how long it lasts this time…

– Posted by James Novak