3D Printed Chainmail: Size XL

20181030_3D Print Chainmail

If you’re into 3D printing like me, chances are you’ve already 3D printed chainmail and been excited by the ability to produce something that is made of multiple parts already assembled and ready to go. If you’re new to 3D printing, what you might not realise is that because you are printing objects in small layer increments, you can print these layers in such a way that different pieces become trapped within each other as the print progresses, permanently assembling them together. This means that something like chainmail, which has been hand assembled for thousands of years one link at a time, can now be printed with all the links in place.

One of the most popular examples in recent years has been from well known designer Agustin Flowalistik, whose unique design of chainmail has been downloaded over 100k times already on Thingiverse! Click here to download the file for yourself and add to this growing number. After one of my previous posts about the new Wanhao Duplicator D9/500 printer, I wanted to see how it would handle the intricate geometry, however, at 200% the scale. Go big or go home!

Well, as you can see from the photos it worked quite nicely. With the large 0.8mm nozzle the layers certainly look rough and messy – this print isn’t going to win any awards for being pretty. But it worked, and on this sketchy 3D printer that’s the most important thing at the moment. One of the nicest things was peeling it off the magnetic flexible build plate of the D9, which you can see in the first picture above – no hacking away with a spatula which is one of the positives of the printer. The links freely move and because of the large size, the chainmail has quite an industrial feel about it. Very satisfying.

So I think I can chalk this one up as a win on the Wanhao D9, which I think brings my score up to about 2 wins, and too many failures to count… Not great but after a firmware update I hope there will be some more wins to come.

– Posted by James Novak

First 3D Print with the Wanhao Duplicator D9/500

IMG_20180917_Webcam 3D Print Mount

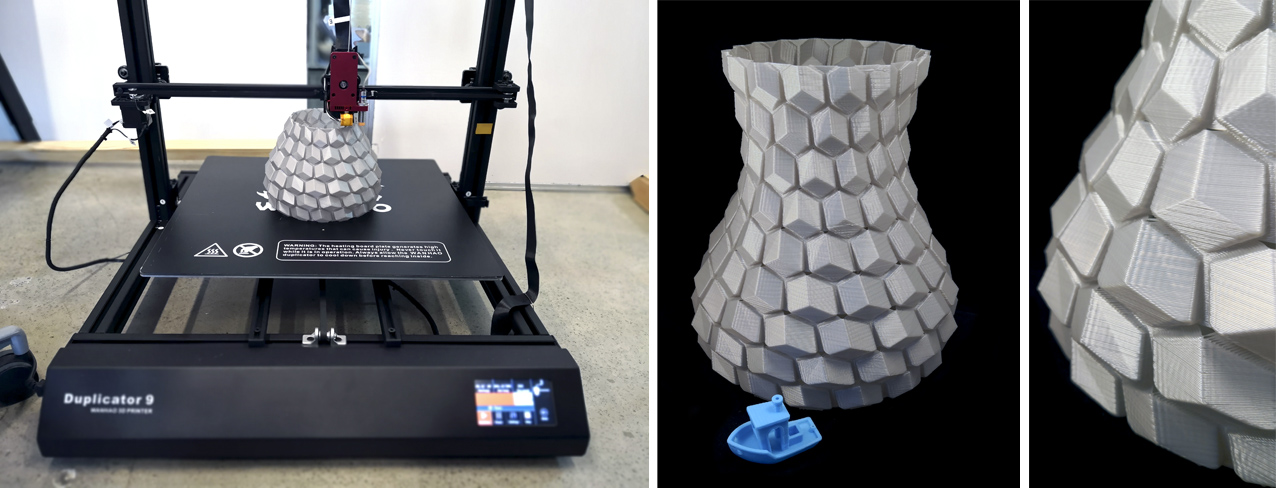
If you have followed my blog for any length of time, you’ve probably noticed I’m quite a big fan of the Wanhao 3D printers – they’re cheap, reliable, upgradable, and just good value for money. Even my Cocoon Create from Aldi is actually just a Wanhao in disguise! Recently Wanhao released the Duplicator D9/500, which has an incredible 500x500x500mm build volume. Yes, you read that right, those numbers are not a typo! The picture above doesn’t do it justice, this is a big unit that currently we can only store and run on the floor until we can free up a large desk. Manoeuvring this thing is definitely a 2 person job!

Before I get into the details of the machine and my first experiences, the printed vase pictured above is the first successful print, which is the Curved Honeycomb Vase (free on Thingiverse) printed at 200% scale. Printed in vase mode (aka “spiralise” in Cura) with a 0.8mm nozzle, this print took approximately 6 hours to complete. A great design in itself, and very cool at this large size.

However, it certainly hasn’t all been smooth sailing with this printer. First, there were some lengthy delays from Wanhao between when we placed the order and finally received the machine – apparently some manufacturing and quality control issues, and Wanhao may have released the machine a bit too early to market. In total we waited several months, however, they may be much faster now that issues seem to be resolved. The second big issue we faced was assembly – the supplied instructions weren’t particularly useful or even relevant, with some of the components no longer supplied with the printer – it seems that the initial release included large brackets to help stabilise the frame and some other details in the instructions, so we were left feeling like we were missing some parts. Apparently we are not, although we still haven’t figured out some of the cable management issues and have had to hack together a temporary solution for now.

Another challenge with assembly was in constructing the frame; obviously at such a large size the frame wasn’t pre-assembled like the smaller Duplicator 3, and the frame also uses extruded aluminium rather than folded sheet metal. Squaring all of these extrusions is not simple, and some initial issues when running the machine were related to having one of the vertical frame pieces lightly twisted. Some better alignment details are definitely needed.

The final issue that we’ve been experiencing is in the auto-levelling sensor, which was not installed at the correct height in the factory and required a lot of manual adjustment (we had the nozzle collide with the bed several times when first running it). However, even with this, the machine doesn’t really seem to adjust the prints for any levelling issues; our first prints across the bed revealed a number of areas where the bed was slightly warped, which were not being corrected by the auto-level feature, so we are currently manually doing adjustments for now. And we have found the central area of the bed is OK, so the vase printed really well.

So overall I would have to recommend that anyone considering this printer hold off for at least a few more months, there are just too many issues for anyone without a lot of experience calibrating 3D printers, and without the time to really get in and troubleshoot issues. Last time I searched on YouTube it seems others have also come to a similar conclusion. I think with time this will be a great 3D printer, we’re certainly going to keep learning more about it, but this seems like a case of a manufacturer rushing to market without properly testing and perfecting their equipment. Unfortunately, an all too common story in the 3D printing world.

Make sure you follow my blog and social media accounts to keep up to date with ongoing test prints and posts about the Wanhao Duplicator D9/500. And please share your own experiences in the comments section so we can all learn from each other 🙂

– Posted by James Novak

*UPDATE 14/1/2019 Recently I have updated the firmware of the printer to see if that would improve performance of the machine. I recommend this as a priority for anyone with a D9, it could fix some of the issues you may be experiencing as there are probably several different versions of firmware out there now depending when you purchased your printer. While I haven’t noticed a difference with the levelling issues, it’s always worth running the latest firmware to fix any other potential issues. This video tutorial is excellent, I followed it exactly and managed to update both the LCD display and motherboard to version 0.164(B).

For now I’ve manually adjusted the levelling sensor so that in some areas the nozzle is lower than it should be, pushing into the print surface. This makes other areas of the warped plate the correct height, and after a few layers seems to level things off and be printing OK. Not great, but working for now.

InMoov No Longer InPieces

20161018_inmoov-robot-arm

Over the past couple of months my build of the InMoov robotic arm has continued to progress slowly in the background, until now I find myself near the end. So about time for a little update on the build since my last post where I only had the arm and wrist pieces printed and partially assembled.

Now that the hand and fingers are assembled this is really starting to look cool, with a good range of movement and nice details controlling these movements. Let me say (if I haven’t before) that this is really not a project for the feint of heart – sure you might get lucky and be able to 3D print all of the parts without a hitch (although if you 3D print as much as me you know that for all of these successful prints assembled into the hand, there are many more failures!), but much of the challenge is in having the tools and patience to assemble them together properly. Each joint has needed filing, drilling of holes, gluing, even some acetone to clean up some of the rough surfaces to save reprinting, and of course these processes have been repeated numerous times. But that’s what I love about a project like this, you get to understand how every piece works.

20161021_inmoov-hand-shake

Threading the Spectra braided line (I found a roll of 180lb 0.7mm Spectra quite cheap on Ebay) again requires the patience of a surgeon and a nice pointy set of tweezers, but I’m really loving how I can already start manually controlling the fingers by pulling on the lines. When doing this I found that some of the fingers were stiff and required a lot of force to move, so again you need to be prepared to take things apart and file them down before gluing anything into place, or the servo’s just won’t cope. I’ve found a little bit of lithium grease to be useful to help prevent binding of a few of the joints, but most of them are working quite smoothly without, pinned together with 3mm filament as suggested in the build instructions (so simple if you have access to some of the larger diameter stuff).

Next step is to connect the Spectra lines to the servo’s, which I’ll admit I’ve been nervous about since getting this right is critical, and then it should be up and running! I’ve bought an adjustable power supply to give the servo’s the power they need, seems like they can draw a lot of current when they move, far more than the Arduino/computer can give, so hopefully my next post will have a video of it moving 😀

– Posted by James Novak

InMoov First Twitches of Life

20160820_InMoov Arm Servo

The 6 servo’s needed to build the InMoov robotic arm/hand arrived since my previous InMoov post, and are now installed and working individually. All up they cost about $35AUD on Ebay. The Meshmixer hack for the stands I discussed in the last post also worked quite well, and luckily no other stands to mount the servo’s have needed re-printing – just a few spots of super glue to prevent any minor splitting between the printed layers. This means that most of the assembly of the arm and wrist is now complete, other than running all the lines to control the fingers (a big job I’m not looking forward to). Below is a video of the wrist movement using a MG 996 servo – sounds like it means business!


Nothing particularly exciting just yet, although it’s nice to see the InMoov showing the first signs of life (Frankenstein anyone?). As you can see I’ve connected this servo to an Arduino Uno, and am manually controlling the movements using Grasshopper and Firefly, both plugins for Rhino 3D CAD software. I’m not sure if any other InMoov makers have done this, but if you’ve followed my blog for a while you’ve probably seen previous demonstrations of how you can use what is essentially a 3D CAD program to control the Arduino in real-time, something I’m very excited about. I certainly aim to continue using this visual programming language (VPL) to interact with the arm, perhaps making it more intuitive and interactive to control. Next step: 3D printing the fingers.

– Posted by James Novak

Brimming with Success

20160712_3D Print Brim

Excuse the headline pun, but this post is all about 3D printing using a brim, which evidently can really improve your success rate with large flat surfaces.

For those not familiar with a brim, it’s an option in some 3D print software (such as Cura) that lays down an extra width of material around your object and attached to it, one or two layers tall. You can see the brim around my enclosure in the top left image. Essentially this extra material creates a stronger bond to the build plate, helping to fight the contracting forces of the cooling plastic that can commonly cause warping. Of course there are many other ways to combat this, including laying down some glue or adhesive spray, printing the part in a different orientation, or using an enclosure to keep the print warmer so there is less warping from rapidly cooling plastic. However these aren’t always an option, so using a brim can be a really effective solution that only wastes a very small amount of extra material.

In the top right image you can see my first attempt at printing this enclosure half, which is very clearly warped as the outer edges lifted up from the plate under the contracting forces of the cooling plastic. Support material was used, but nothing else. In contrast, you can see the middle image which is the end result once the brim from the left image was removed – perfectly horizontal! This is really important for this design since it is one half of an enclosure, and the warped version simply won’t fit properly with the other half.

20160712 CuraIt’s certainly not something needed for every print, but for large surfaces it’s proving to be very successful. If you’ve had similar problems with warping and haven’t tried a brim yet, it’s worth giving a go – you can see where to access this setting if you are using Cura on the left, very easy, or if you are using another program to slice and print, have a look through your settings. The raft is another option you may have used, however the raft builds up a lot more material underneath your entire object which is wasted. It can also be a good option though, especially if you are using a printer like the Up Plus 2 which does not have the option of printing a brim but will do a good job with a raft.

– Posted by James Novak

Goodbye 3D Printing, Hello 4D Printing

Many people I talk to at events and workshops are only just catching on to this whole 3D printing thing, but did you know some of the exciting research in this field has already moved on to the next dimension – literally?

4D printing might sound a bit weird and wacky, but it basically just means something that has been 3D printed, but changes its shape afterwards since time is the fourth dimension. So a 3D print that changes over time. Skylar Tibbits from MIT is really one of the pioneers of such a concept, so if you want to wrap your head around the concept this link to his Self-Assembly Lab at MIT will have some more videos to explain what it means. Having spent some time lately writing about 4D printing for part of my PhD, I thought it was time to give it a go, taking inspiration from the Active Shoes created by the Self-Assembly Lab.

As you can see from my very rough video, it’s actually quite easy to do. All I did was create a few concentric circles in CAD with a 0.2mm thickness so that they would print only 1 layer thick on my Cocoon Create 3D printer. I then stretched some material (from an old pair of stockings – not mine I swear!) over the base plate and held it in place with clips. A slight adjustment to the height of the base plate to make room for this material and 1 minute later it was done.

20160628_4D Print

The result is really cool (I think) for something that only took 1 minute to print. It’s certainly not perfect, but shows a lot of opportunity for the future of fashion design. If you wanted to only use 3D printing to create this shape it would easily take 20 minutes or more on a standard FDM printer, so I think some more experimentation is required.

– Posted by James Novak

A 3D Printed Furry Bear (and a cat or 2)

20160505_3D Print Bear Cats

This is a real blast from the past – the bear pictured in the photos is actually from a Solidworks model that I created back in 2012, long before I had my own 3D printers. Today I dug it up and decided to breathe some life into the little guy using my Cocoon Create 3D printer – sometimes I almost feel like Frankenstein!

By complete accident, he’s printed out with a bit of fur down one side! This is just where a small support structure which was building to support his ear broke off (the support really wasn’t needed anyway), and therefore the small amount of plastic which was then extruding into thin air became joined when the nozzle went to the main model. But a pretty cool effect that I’m not going to clean off. I remember reading about some researchers who had perfected 3D printing hair, I wonder if this sort of happy accident inspired them?


The other 3D print is a simple download from Thingiverse of the Cuddling Cats by PixelMatter3D, just a fun little print when you want to give someone a gift. If you’ve followed my blog over the last year, you’ll probably notice it’s not the first time I’ve 3D printed a cat – check out this other Thingiverse cat I printed which can make a really cool lamp.

– Posted by James Novak

3D Motorcycle Licence Surround

20160313_Licence Surround

Now that I have my Cocoon Create 3D printer I can’t help but find new things to print for my bike! Since the bike is from 2007 the licence plate is a little bit shabby, so it seemed like a good chance to print a surround to tidy the edges up and also tie in with the other 3D prints I’ve done using this green PET+ material from MadeSolid. As you can see above, I chose to split the surround into 2 halves for printing, making it both easier to print (less chance for warping) and also easier to install. If you look at the Sketchfab 3D model below, you can see I designed a few hooks and details to secure around the licence plate, so being able to install it in 2 pieces made sense. There are 2 bolts used to secure the surround in place using existing holes on the licence plate, and the bottom split area was glued after being fitted for a seamless look.

While the final design works well, this one wasn’t all smooth sailing. The first print on the left in the image below didn’t quite fit onto the licence plate, so a few details needed to be changed in the Solidworks CAD model. The second partial print I tried printing vertically, rather than lying down, with the hope that it would require less support material. Unfortunately I had to stop this print as the surface details seemed to be getting worse as it printed, probably because of the height and inherent flexibility of the thin part the higher it got (a bit like a skyscraper swaying in the wind).

20160312_Licence Details

The third part pictured is the final successful part, printed lying down and using support material automatically generated in Cura (my slicing tool to generate the G-code for the printer) for the overhangs. While the visible surfaces look great, the detail picture on the right shows the messy underside surfaces which I’m not too happy about. This must be a setting in Cura that I’m missing and haven’t noticed in my previous prints on the Cocoon Create which have rarely required much, if any, support material. I’ll have to have a close look next time I print something requiring a lot of support like this – anyone have any ideas?

– Posted by James Novak

Motorbike Indicator Adapters

20160227_Bike Indicators

An issue with owning an older (well 2007 isn’t really that old!) motorcycle is that finding parts gets harder and harder. The previous 3D prints for my bike (such as rear peg plugs, key guard and mirror plugs) have really just been cosmetic, but after buying some sleek little LED indicators to replace the huge stock ones, I came across a problem – the fitting point for the rear indicators is specific to the shape of the stock ones, which is a really large cut-out and has nowhere to install the standard indicators designed to fit most bikes. There was also nothing online I could find ready to buy. One option would be to simply drill a new hole through the plastic mud guard, but this would leave the previous holes on show and mean that if for some reason someone ever wanted to put the stock indicators back on, they would now have these new holes to deal with.

No, not on my watch! My first idea started with trying to fit something from the inside of the mud guard, plugging the hole and providing a new point to mount the LED indicators inside of this. The problem was measuring this area, with other wires and complex shapes, it became quite challenging to get any accurate measurements. Since I’ve already used the green PET+ filament on the bike, I may as well make this indicator adapter a feature, and use the flat outside face of the mud guard to easily create a paper template as shown in the top left image. This was scanned, traced in Adobe Illustrator, exported as a .dxf file, and then imported into Solidworks to create the final 3D form. This might seem like a lot of processes, but is a really accurate method of getting a starting point for 3D modeling when dealing with flat surfaces using basic equipment at home.

The final 3D print pictured was done on my new Cocoon Create using 0.2mm layer thickness and took about 55 minutes to print. While the final design looks flat, there are a few tricky details on the back used to lock it in place with only 1 screw (thankfully the mud guard had a useful threaded hole for mounting). I will now be interested to see how well the PET+ plastic holds up out on the road – it seems quite secure, and the indicators are very lightweight, but who knows what can happen out on the road.

– Posted by James Novak

UPDATE: I am now trialing the use of Sketchfab so you can easily view 3D models of my work – check it out below!

Cocoon Create with PET Filament

20160219_3D Print PET

I think I need to start off with a bit of a colour code:

My collection of 3D prints off the new Cocoon Create 3D printer is growing, and the quality is excellent! On the top left you can see the parts I’ve printed so far (SUP Paddle Clip, Motorcycle Key Guard, Motorcycle Rear Pegs Plug). Top right shows a comparison between the Up! Plus 2 and Cocoon Create for the same part, with not noticeable differences at all – a really great result considering the Cocoon Create printer is nearly a quarter of the price!

20160219_PET 3D Prints

PET+ is meant to be as strong as ABS, but more flexible which is particularly great for the Motorcycle Key Guard shown just above which must flex and snap around the top of some handlebars. The PET+ material prints at the same temperature as ABS, and results in a slightly more glossy finish. I also noticed there was no smell during printing, which of course is very noticeable when printing with ABS plastic – I wonder if this results in better air quality? There is of course a growing interest in the VOC’s associated with melting plastics for 3D printing. The quality of this part is actually better than my previous prints from the Up! Plus 2, and printed with almost no support material as shown in the image just above, whereas the orange print on the Up! Plus 2 was full of support and a nightmare to clean up with pliers. And did I mention the the Cocoon Create is only a quarter of the price? So far a real win.

If you want to read a bit more about this printer, which is based on the RepRap Prusa i3, just check out my First Impressions article, or head to the Cocoon Create website.

– Posted by James Novak