3D Printed Toys with Moving Parts

My desk is covered with 3D prints, some of them my own designs, and others are just cool examples of what can be done with a home 3D printer. This is one of those examples.

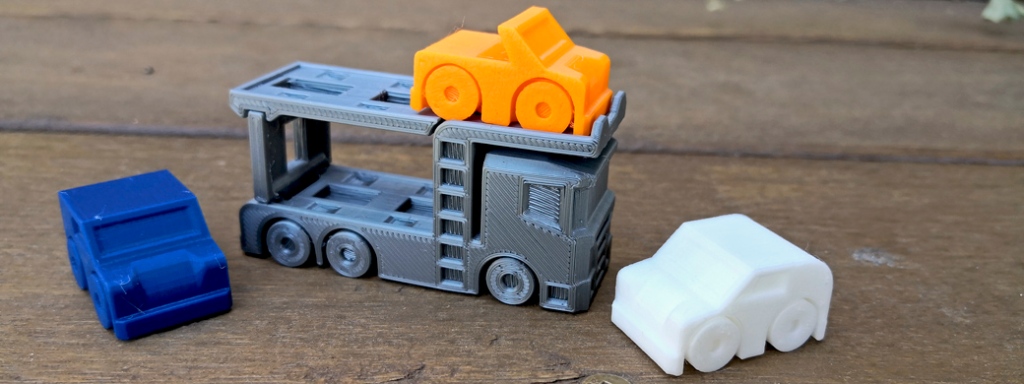
Stian Ervik Wahlvaag (@agepbiz) has created a clever range of 3D printed vehicles known as “Tiny Surprise Eggs” – why? Well, because they fit within an egg of course! The unique feature of each toy (and egg) is that they feature moving parts printed in place, without the need for any support material. Once the toy is taken off the printer, it is ready to go. The example pictured above is “Surprise Egg #7 – Tiny Car Carrier” and all the vehicle wheels rotate, and the car carrier itself can raise and lower the ramps.

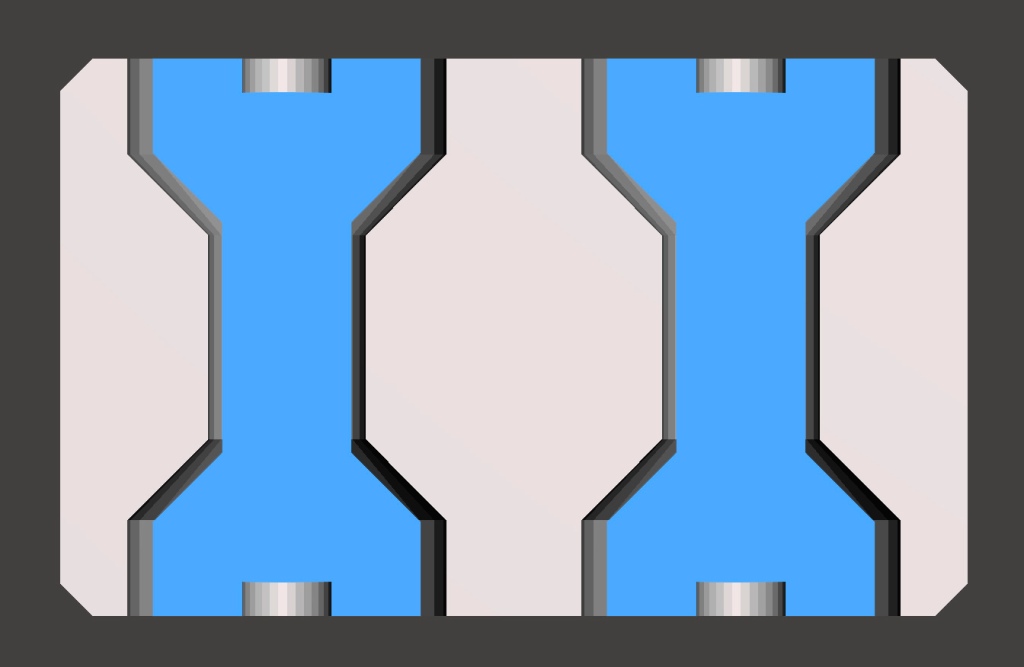
While I didn’t print the egg, I did scale these prints up 200% to have something a little bit more child-friendly. Unfortunately I enjoy them so much they have permanently stayed on my desk, but I promise I’ll print my son another set! The moving parts still work really well at this increased scale and provide some clever design tricks to ensure multiple parts can be printed as an assembly. As an example, above is a cross section through one of the cars showing how the wheels and axels are designed within the main body of the car. Some simple angled details mean that no support material is needed when printed in this orientation, yet from the outside the car just looks like it has normal cylindrical wheels. Great example of how to design for additive manufacturing (DfAM) as it’s known.
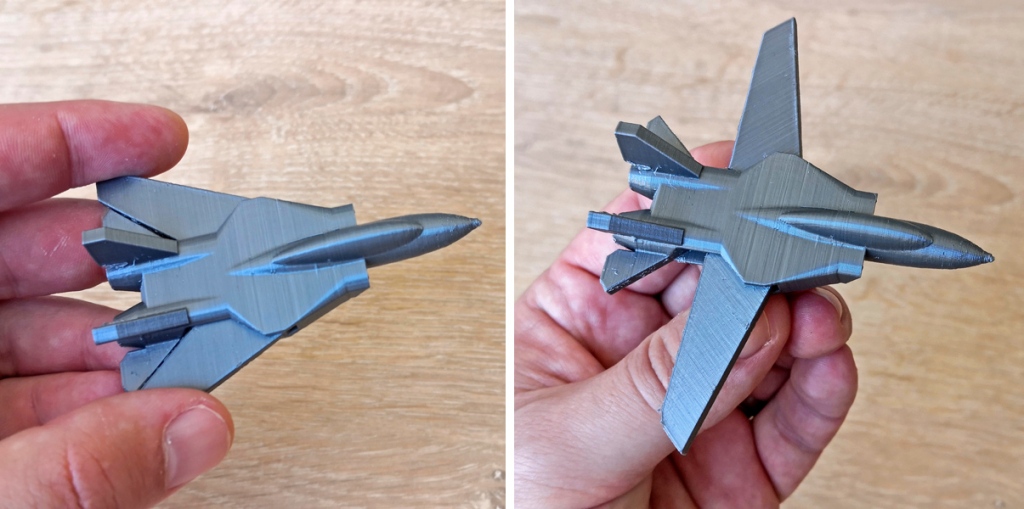
Following the vehicle carrier, I’ve also 3D printed “Surprise Egg # 6 – Tiny Jet Fighter” which features wings which fold out, again at 200% scale and with no support material. Both of these designs, as well as at least 8 more surprise egg vehicles, are free to download from Thingiverse, and highly recommended as a way to test your print settings (if there are any issues the moving parts may end up fused together), and learn a few of the tricks for designing assemblies for 3D printing.

If you print these yourself, or have any other recommended prints that include clever design details like moving parts, please share them in the comments section.

– Posted by James Novak
3D Printed Assemblies

20180420_3D Print Moving Assembly

One of the most interesting features of 3D printing is that it’s possible to print multiple parts in their assembled state, reducing the need to bring together a whole range of different pieces and assemble them using screws, snaps, glue etc. While this is normally easier using the Selective Laser Sintering (SLS) process, with a bit of experience and some clever design skills, it’s possible to 3D print moving assemblies on a basic desktop FDM machine.

Pictured above are 2 objects I’ve been wanting to 3D print for a long time as great examples of what can be done with an FDM machine. The first is called an Air Spinner and is free to download from Thingiverse. Due to the tolerances and angles between each part, no support material is needed, and you can literally start spinning each of the pieces straight off the printer, functioning like a gyroscope. A nice quick print, and a great demo piece. Below is a video I found of someone printing and spinning one so you can get the full effect.

The second print pictured to the right is a Planetary Gear Keychain, also free to download from Thingiverse. This one is much more of a test of your printer’s settings, the first time I printed it all of the pieces were completely fused together and impossible to free. Even this print required a knife to separate pieces that formed part of the first layer, with the squished plastic bonding them together as my nozzle was slightly too close to the print plate. This one is remixed from another design on Thingiverse which I recommend you check out for all the instructions to help get the best result, and read how other people achieved successful prints. Here’s a short video to see the planetary gears in action

If you’re looking for some fun prints to share with people, these 2 are very much recommended and relatively quick, although I’m still a very big fan of the Kobayashi fidget cube from one of my previous posts whichis another great assembled object. If you’ve got a favourite 3D printable assembly, leave me a comment/link below and I might add it to my list of things to make!

– Posted by James Novak

Hybrid VR Headset

2015-01-16 VR HybridYesterday I completed the Google Cardboard Virtual Reality (VR) headset and mentioned I was planning to try a simplified hybrid version that would incorporate 3D printed components. Well here it is after a morning of cutting and printing!

One of the problems I had with cutting the original Google Carboard was the difficulty (and pain!) cutting all those small details, slots and holes by hand, eventually using a Dremel to carve out the eye holes (check out my original by clicking here). I have also been looking through the designs on Thingiverse to 3D print, however can’t find a design that seems properly thought through and doesn’t include unnecessarily chunky sections of material that seems wasteful (yes just another bit of motivation to get onto designing my own). However the adjustable arms many designs feature seems useful to optimise user experience for individual eye width, focus etc, and to improve visibility of the phone screen.

I have downloaded and 3D printed just the arms from the OpenDive Headset, which perfectly fits the 25mm lenses I bought on Ebay. Something else I’ve realised through printing is that if I were to 3D print the full headset, it wouldn’t fit onto the small print plate of my Up! Plus 2 3D printer with it’s 140mm maximum dimension. I would either have to slice the model in half and glue together after printing, or print on a larger printer (which reminds me I have still not heard anything about when my Solidoodle Press will arrive, and has the larger print size I would need! Check out my little rant by clicking here).

2015-01-16 Google vs HybridI have also significantly simplified the design of the Google Cardboard template to suit the thick cardboard I’m using and 3D printed adjustable lens holders as shown in the images above. This new design was significantly quicker to cut!

Overall the completed design is nice and easy to make, provided you have a 3D printer on hand. I’m getting a much clearer view of the phone without anything obstructing the lenses, however it takes a few minutes to get the positioning of the arms correct for your eyes. If you look closely at the top images you’ll see I used a sharpie to mark a line on both the cardboard and the lens holders where the optimal position is for my eyes. Like last time I’ve also used a small bolt to hold it all together, and used my 3D printed ‘edditive’ logo to stamp onto the cardboard (which you can read more about here).

– Posted by James Novak

Merry Xmas – Download my Beer Bottle Lock

2014-12-18 Beer LockAs promised I’ve uploaded my design of a Beer Bottle Lock (click here to read how it all started) for you to download for FREE! Simply follow this link to download from Thingiverse.

Hopefully this brings you a bit of fun over the Xmas holidays, I’d love to see how it works for you so please share your comments and photos here or through Thingiverse. I’ve kept the dimensions quite loose so that it should securely fit a wide variety of bottle shapes; if you don’t need this flexibility you might like to thicken 1 or 2 areas on the inside prior to printing.

Merry Christmas all!

– Posted by James Novak

Beer Bottle Lock – Remixed

2014-12-17 Beer LockFirstly let me state this is not an original idea – recently a Beer Bottle Lock made the rounds on 3D printing news sites, stemming from an Instructables tutorial by JON-A-TRON (click here to see the original DIY Instructable).

However I thought it was a lot of fun with Xmas coming up, so decided to make one for a member of my family (hence the writing on top “John’s Beer”). Great little project involving measuring (and inevitably drinking!) lots of beer, and designing around this base model. The main difference between my design and that of JON-A-TRON is that mine requires no screw – it holds together once once locked around the bottle top, even though it is printed as 2 separate parts. I think my design is also ‘slimmed- down,’ therefore probably easier to snap off if someone really wanted to – however this really is just a bit of fun, anyone who seriously wants to lock away their beer either has some paranoia issues, or just some dodgy mates!

I still want to make some changes, but once complete I may upload to Thingiverse for you to enjoy 🙂 This is also my first print with a new (to me) brand of ABS called Zortrax, running it through the ‘Up! Plus 2‘ 3D printer. So far really happy with it, and EXCELLENT price from 3Dprintergear.com.au ($32.95 per Kg). Check it out here if you’re looking for cheap filament in Australia.

– Posted by James Novak

Moving Parts (with Updated Video)

After yesterdays test, I’ve made some modifications to the model and am quite pleased with the result. Rather than dealing with support material I’ve instead separated the pieces as independent parts, using snaps to bring them together. As you can see there is a lot of movement, and while it’s not exactly what I expected, it’s a good outcome that I’m going to keep pursuing. It reminds me of some of the work by Nervous System.

I have also made a simple frame to try and control the movement to be more like the facade of the Al Bahr Towers that originally inspired this experiment (read the first post here). It’s far from perfect, but definitely making steps in the right direction.

– Posted by James Novak

Movement and Living Hinges for 3D Printing

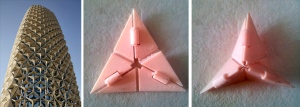
2014-12-13 Live HingeAfter seeing the above photo of the Al Bahr Towers by Aedas Architects I’ve been inspired to try replicating a similar effect with 3D printing. This is the first attempt, printed as a complete assembly. One of the hinges work quite well, but the others are very stiff with support material stuck inside. By forcing it to bend, some layers have snapped but are holding together for now. Through the middle of the 3 triangular pieces I’ve attempted a living hinge using a 0.5mm thickness, one of which snapped straight away. I guess these could easily be hinges similar to the others as well.

So a few good experiments wrapped into one, time to make some modifications and try again.

– Posted by James Novak