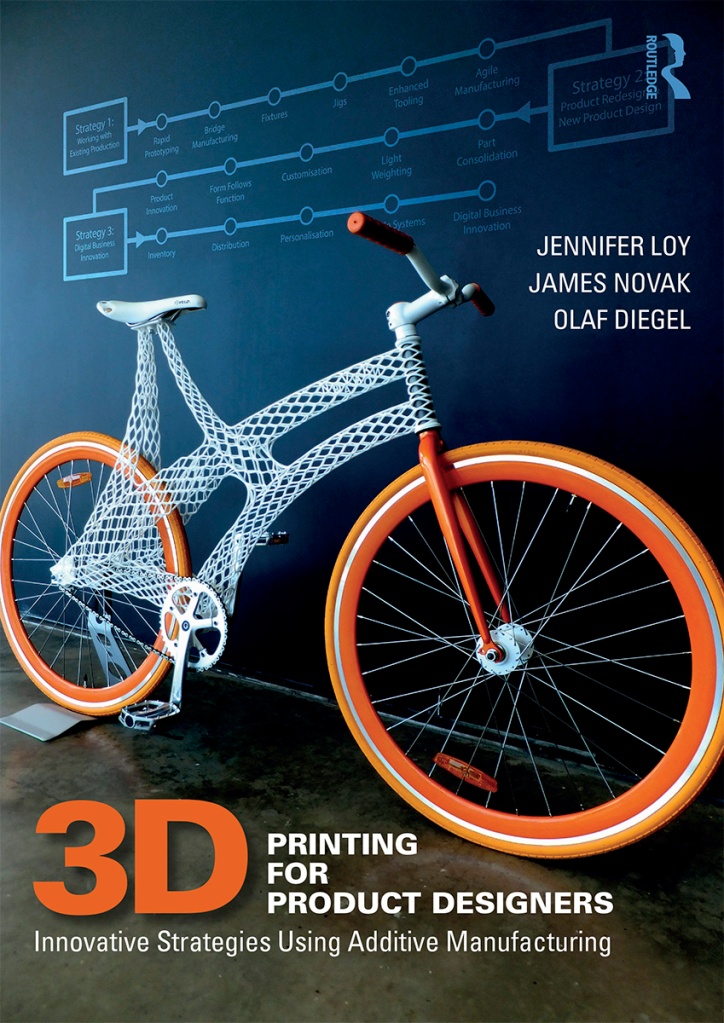
Book: 3D Printing For Product Designers

I’m extremely excited to share some news with you all! For the past 2 years I’ve been writing a book that is specifically focussed on 3D printing strategies and case studies for product designers. I’ve been lucky enough to work with Prof. Jennifer Loy and Prof. Olaf Diegel, both very well known leaders in the field. The book is called 3D Printing for Product Designers: Innovative Strategies Using Additive Manufacturing, and is now available for pre-orders direct from the publisher Routledge (at a discounted price!).

In many ways this book closes my personal first chapter in the 3D printing industry, which began in 2009, and brings together experiences and lessons learned working in industry, with industry, and on cutting-edge research projects at several of Australia’s leading universities specialising in 3D printing. Of course, my 3D printed bicycle has been a big part of that journey, and was selected by the team for the front cover, which is a real privilege. And yes, there is a detailed case study in the book that explores this project in more detail for anyone interested.

Obviously there are already some fantastic books on 3D printing, with Ian Gibson et al.’s book Additive Manufacturing Technologies probably the most well known, originally published in 2015. Our co-author Olaf Diegel also led writing a more recent book called A Practical Guide to Design for Additive Manufacturing, and 3D Hubs have a nicely illustrated book called The 3D Printing Handbook. There are others, but one thing most of these books have in common is that they’re particularly written for engineers, with lots of technical guidelines and explanations of the different 3D print technologies (which can date quickly given the rapid pace of technology developments). There isn’t a book written specifically for product and industrial designers using 3D printing, and there isn’t one that helps companies understand how to effectively adopt the technology. That’s where our book fills the gap.

The book revolves around 3 overarching strategies that can be followed chronologically, or selectively chosen depending on a company’s specific needs:

  • Strategy 1: Working with existing production – includes rapid prototyping, bridge manufacturing, fixtures, jigs, enhanced tooling and agile manufacturing.
  • Strategy 2: Product redesign and new product design – includes part consolidation, light weighting, customisation, form follows function and product innovation.
  • Strategy 3: Digital business innovation – includes digital inventory, distribution, personalisation, scalable systems of supply and digital business innovation.

The goal is to help designers and engineers lead their company or client through a process of incremental change. This is particularly important for established companies with a workforce (or management) resistant to change. It can also be used to inform new entrepreneurial activity, allowing startups to begin at the cutting edge of digital business innovation.

Real-world case studies used to illustrate these strategies include bicycles (of course!) and other sports products, guitars, furniture, medical devices and prosthetics, jewellery, heat exchangers and more. Many of these have come from our friends and colleagues around the world, and the book features over 100 high quality colour photos to illustrate these.

The book is currently in production, so I can’t share a lot more right now, but I look forward to sharing some more detailed posts soon to give previews of different sections of the book. Stay tuned!

– Posted by James Novak
The Rise of 3D Printed Prosthetic Eyes

Recently there’s been quite a lot of attention on the use of 3D printing to manufacture artificial eyes (aka. ocular prostheses). This has largely been due to an announcement out of the UK that the world’s first 3D printed artificial eye was implanted in a patient.

Quite a cool milestone and application of 3D printing, and also happens to be a field I’ve been investigating for the past 6 months with some of my colleagues at the Herston Biofabrication Institute. We’ve just published a review of all research into the use of 3D printing for orbital and ocular prostheses, and you can access the full article for free here.

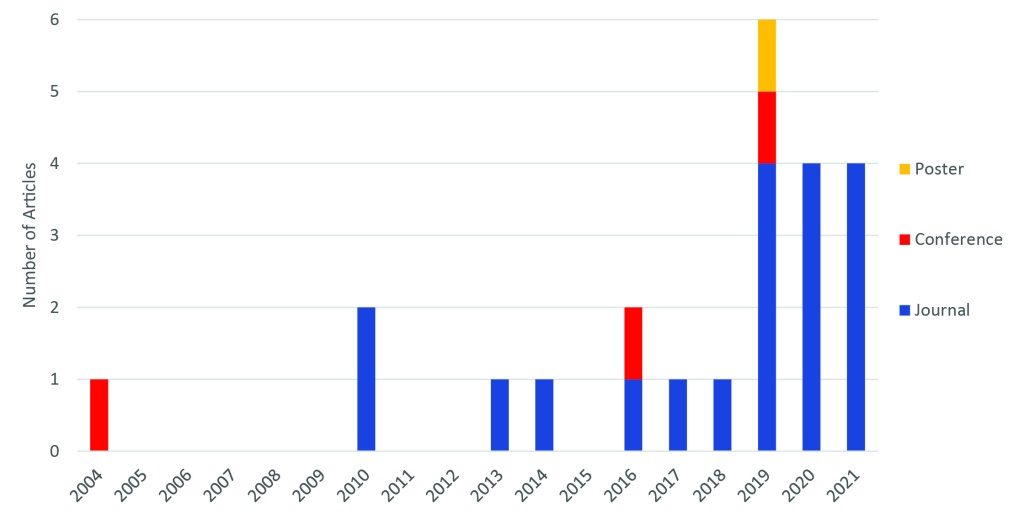
The graph above does a nice job of showing the overall trend for research on this topic, with the first ever paper dating back to 2004. Early studies like this certainly weren’t 3D printing eyes and implanting them in patients, but instead used 3D printing as part of the process, creating moulds and similar devices. The first time a 3D printed part was directly used as part of a prosthesis was in 2014.

Perhaps one of the best ways to demonstrate what is possible now using full-colour 3D print methods (material jetting) is the below video from Weta Workshop. While these may be eyes for monsters, the same principle is being used for human prosthetic eyes. One of the key differences between what Weta Workshop have achieved, and what is being done for patients, is the need for biocompatible materials, as well as the need for a patient’s eye to perfectly match their existing “good” eye.

While it’s early days in the clinical trial phase of implementing 3D printing for prosthetic eyes, there are many benefits which we summarised from our research, including:

  • Manual steps in prosthesis fabrication can be replaced by digital methods, potentially saving time
  • Less discomfort to patients through use of medical imaging or 3D scanning techniques
  • Weight reduction compared to traditional methods
  • Improved accuracy and fitting of prosthesis
  • Minimised need for gluing a prosthesis to the skin
  • Good realism of eye
  • Ability to easily re-print the same components in the future

Of course, there are currently some limitations as well, such as:

  • End-use 3D printed parts are typically not biocompatible and require coating with PMMA or used as a mould to cast with biocompatible material (although the UK trial shows that direct 3D printing of multi-colour biocompatible materials may be possible)
  • Experience in computer-aided design (CAD) technology is required, which is not part of traditional skillset for prosthetist
  • AM times are slow (although they can also happen overnight or while a specialist does other things)
  • Rough surface quality of parts requires additional post-processing e.g. polishing
  • Challenges associated with using 3D scanners e.g. patient movement or scanning anatomy with hair
  • Expert manual skills are still required for some steps of the workflow
  • Use of CT scanning for the purposes of creating a prosthetic increases patient exposure to potentially harmful radiation

Research to-date has been limited to small case studies and engineering experiments, making it difficult to understand whether outcomes will translate to the clinical context. It will be great to see how the UK clinical trial progresses, and hopefully provides improved outcomes for patients. Let’s watch this space!

– Posted by James Novak

3D Printing Build Farms

3D printing is a slooooow process. While 3D printing geeks like me can spend hours watching a printer lay down layers of plastic, it often turns manufacturers off who are used to rapid manufacturing process like injection moulding where parts can be pumped out every few seconds. However, there is a way to produce products en masse and it’s called the 3D printing build farm.

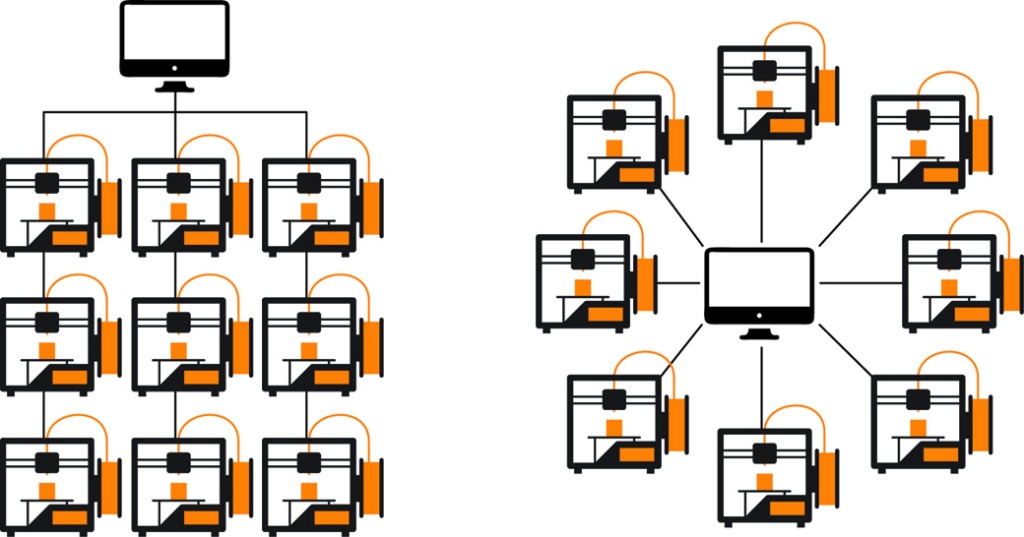
Perhaps you’ve already seen images like the ones above – these are well known examples of 3D printing build farms at Ultimaker (left) and Prusa (right) that illustrate what they’re all about: Lots and lots of 3D printers! A 3D printing build farm is basically just a collection of several 3D printers, or many hundreds of 3D printers, that can significantly scale up the production of parts. These can often be networked together as part of a single management system, meaning only a small number of workers are needed to keep an eye on things. The benefit over other mass production technologies is that you still retain the benefits of 3D printing a unique item on every 3D printer, rather than just producing thousands of exactly the same product. Of course, you can also produce thousands of the same part, for example the Prusa build farm is made up of over 500 of their own 3D printers, which are used to print many of the parts to assemble new 3D printers.

A centralised build farm (left) and a decentralised, geographically dispersed build farm (right)

Recently I published a book chapter analysing 3D printing build farms in the context of work and the future. Titled ‘3D Printing Build Farms: The Rise of a Distributed Manufacturing Workforce,’ one of the main opportunities we discuss that has not yet been exploited is for 3D printing build farms to be geographically distributed, rather than centralised within a single facility (illustrated above). If all the 3D printers within the build farm are connected to a central management system, then they do not actually need to be located in the same physical location.

Obviously there are some benefits to having all the machines located together, particularly for maintenance and monitoring. However, there may also be several benefits to distributing the 3D printers domestically or internationally, particularly in light of the COVID-19 pandemic and the longer-term changes we may now enjoy working from home, or at least working in a more decentralised manner:

  • 3D printers can be located closer to customers. Centralised 3D printing build farms must still ship products around the world, just like conventional manufacturers, which costs time and money.
  • Distributed farms may better suit new flexible working conditions, allowing people to work the hours they want, from a location they want.
  • New jobs in regional areas with smart regions connected to smart cities. 3D printers may be distributed in regional areas, as well as cities, reducing the need for people to relocate to overcrowded cities in order to find work.
  • Businesses may join forces and utilise shared “nodes” of the 3D printing build farm.

Time will tell if this provides businesses with new advantages, but it is clear that build farms, whether centralised or distributed, are a growing trend with real commercial value. Some of the biggest adopters are in the dental industry, for example SmileDirectClub which uses 49 multi jet fusion 3D printers from HP to manufacture moulds for up to 49,000 clear aligners each day. This is big business, driven by 3D printing and build farm systems.

– Posted by James Novak

3D Printing in Sport – Hit or Hype?

If you’re into 3D printing, no doubt you are familiar with some of the ways it is being used in sports. Some of my own products (above) have included a 3D printed bicycle frame, smart bicycle helmet and surf fins, while in the media products have included shoes, golf clubs and shin pads.

However, as a researcher, I was interested to know how this translates into academic research. How many research studies have been looking at 3D printing for sports products? How much improvement does a 3D printed product offer over a conventional one? Which sports are adopting 3D printing? Working with my brother, Dr Andrew Novak, we hypothesized that given the amount of coverage in 3D printing media, there should be quite a large amount of research supporting the developments of iconic 3D printed sports products, as well as novel developments that haven’t even made it into the media yet. The results – published in a paper titled ‘Is additive manufacturing improving performance in Sports? A systematic review‘ – were surprising (preprint version freely available).

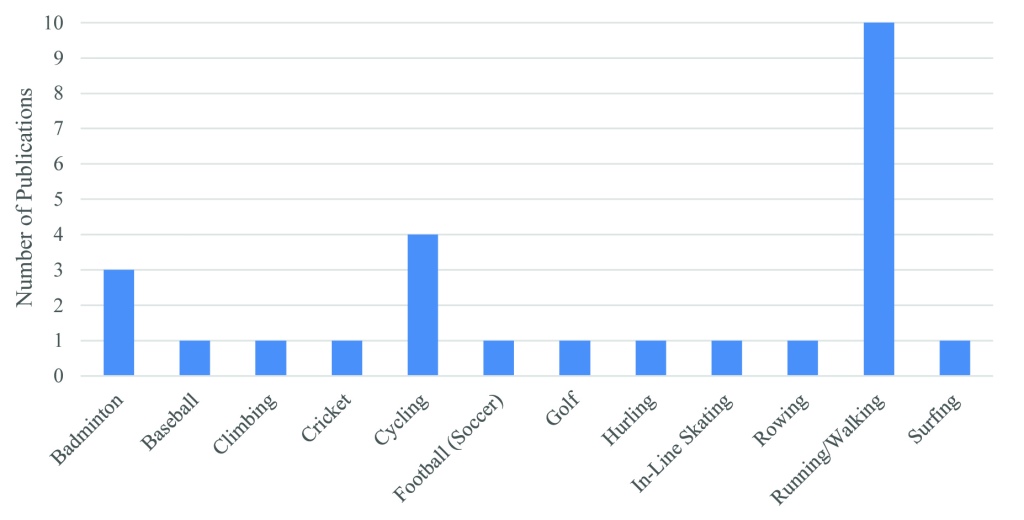
Up until May 2019, we found only 26 academic studies that provided any empirical evidence related to 3D printing for sports products. The graph above shows which sports, and how many articles have been published. The first of these appeared in 2010. Running/walking was the most popular sport with 10 articles (38%), followed by cycling with 4 articles (15%) and badminton with 3 articles (12%). All other sports – baseball, climbing, cricket, football (soccer), golf, hurling, in-line skating, rowing and surfing – had only been assessed in single studies. This means that a lot of research into 3D printing of sports products are just one-off projects, and indicates that there may be very little funding/interest to continue building larger projects.

It also suggests that any research being done to support mainstream commercial applications of 3D printing, for example for brands like Adidas and Specialized, is protected by intellectual property (IP) and not being published.

10 articles (38%) observed improvements in performance of products developed via 3D printing compared to conventionally manufactured products, 8 articles (31%) found a similar performance, and 5 articles (19%) found a lower performance.

From a technical perspective, powder bed fusion technologies were the most utilized with 50% of articles using either selective laser sintering (SLS) or selective laser melting (SLM), although 52% of articles did not name the 3D printer used and 36% did not name any software used to design or optimize products. 3D scanning technology was also utilized in 11 articles (42%).

So, is 3D printing in sport a hit or hype? Based on this research it is clear that within academia, 3D printing is still in the very early phases of consideration, and seems to be significantly behind industry. While you may be able to go and buy some 3D printed running shoes or insoles, or cycle on a 3D printed saddle, you won’t find any objective data in journal articles on these products or much research to suggest that 3D printed products are any better than conventionally manufacture products.

– Posted by James Novak

Popular 3D Prints on Thingiverse

Anyone with a 3D printer will no doubt be familiar with Thingiverse, an online database of files that can be searched, downloaded and 3D printed; a universe of things. I’ve been using it for 7 years, and you can find many of my projects from this blog available there.

While the platform isn’t without its issues, particularly over the last year or so, it is still the largest 3D printing file database with over 1.9 million files at this time of writing – you couldn’t print that much stuff in a lifetime!

Because of the scale, many researchers have used Thingiverse as a way of understanding how people engage with 3D printing and file sharing, and beginning in 2018, I wanted to understand the characteristics of the most popular files on Thingiverse. My research paper has just been published called “500 days of Thingiverse: a longitudinal study of 30 popular things for 3D printing” and as the name suggests, involved tracking 30 things over a 500 day period.

The image at the top is one of the graphs from the paper that compares the downloads per day for these 30 things over time. At the start of the study, a new design called the Xbox One controller mini wheel had just been released and was all over social media, attracting a lot of attention and downloads. This equated to 698 downloads per day. However, this momentum didn’t last. In comparison, well established designs like #3DBenchy continued to increase in downloads per day, and during the period of this study, #3DBenchy became the first thing on Thingiverse to be downloaded over 1 million times! These numbers are beginning to approach figures on more mainstream social media and image/video sites, showing just how popular 3D printing has become. And keep in mind, this is just one of many file sharing websites for 3D printing, a topic that was part of a previous research paper I wrote with friend, colleague and fellow maker, Paul Bardini.

If you’re interested in all the details, I have shared a preprint version of the paper which can be freely accessed. Additionally, all of the raw data can be freely accessed if you’re interested in diving into the nitty gritty details, or even continuing to add to what I started. I hope this provides some insights into the scale of making and 3D printing, and some of the trends that drive the most popular files on Thingiverse.

– Posted by James Novak

Customising Surf Fins for 3D Printing

Early followers of this blog may be familiar with several projects to 3D print kiteboard and stand up paddle (SUP) board fins, including some fins you can freely download if you’re into kitesurfing. It’s been a little while between posts on this topic, however, I have been busy in the background producing a system to help people with no CAD experience design and customise their own fins ready for 3D printing. The full details have just been published in the Computer-Aided Design and Applications Journal.

Quite a few people have used 3D printing to produce surf fins – after all, it’s very cheap and means you can produce just about any geometry you like. Researchers have looked at the strength of different materials and 3D printing technologies for this application, as well as the performance (fluid dynamics) of different geometries. However, if you are not a relatively advanced CAD user, it is unlikely you will be able to design the fin of your dreams, no matter how awesome the research suggests 3D printing can be! This is what I was interested in solving.

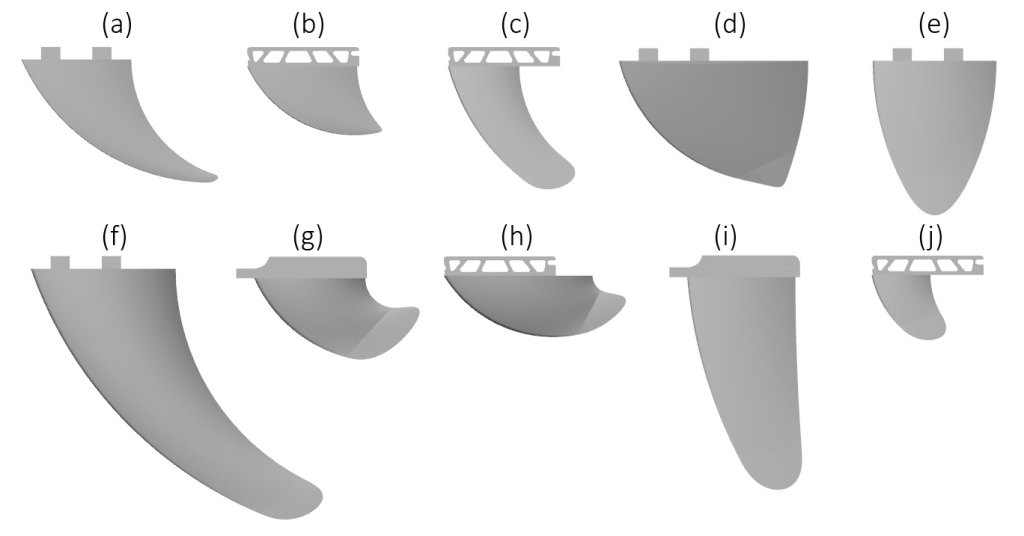
Using Rhinoceros and Grasshopper, the complexity of a fin was condensed down to a series of limited controls that allowed for freeform experimentation. The above image is the interface that allows surfers to customise a fin design in real-time. It is based on a handful of common fin properties such as the fin system, fin position on the board, cant, fin depth, sweep, base length, base foil profile, tip sharpness and tip thickness, all of which can be modified using some simple sliders or dropdown menus. Feedback is also provided in the form of overall dimensions and volume. From the image at the top of the page, you can get a sense for the wide variation in designs possible from this simple interface.

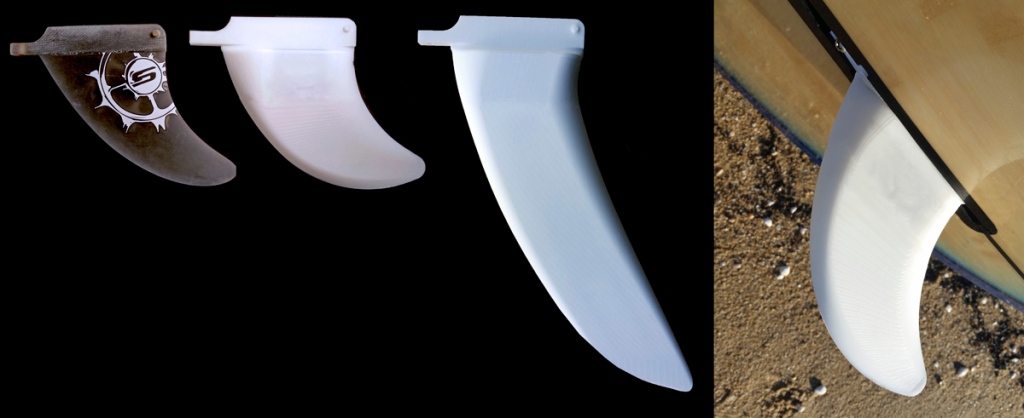
Once you’re happy with the design it can be exported ready for 3D printing. I’ve 3D printed a couple of different designs for testing on my SUP board, the smaller white fin in the image above being 3D printed using FDM, while the larger fin was 3D printed using selective laser sintering (SLS). Both worked well in flat water paddling, although I’m sure some carbon fibre would give me a bit more confidence heading into the surf.

Hopefully some more to come soon as spring and summer approach.

– Posted by James Novak

3D Printed Face Shields vs. Masks

As the graphic above shows, 3D printing a face shield is twice as fast as 3D printing a face mask. How do I know?

In my latest journal article called A quantitative analysis of 3D printed face shields and masks during COVID-19, I documented 37 face shields and 31 face masks suitable for fused filament fabrication (FFF, or FDM). The graphic provides the average data for all the different designs, including a range of qualities including the amount of filament required, number of 3D printed parts, total volume of all parts, and the dimensions of the largest part for each design (so you know if it will fit within your 3D printer’s build volume). If you’re interested in all of the specific details for each of the individual designs, all of the data is free to access here. You might also want to start with my first article analysing 91 3D printing projects at the start of the pandemic.

Why is this important? Well, if you look at the graph above, you can see that the print time and amount of filament for each individual design varies significantly. For face shields, the shortest print time was 46mins to produce a single part with 12g of material for the Version 1 face shield from MSD Robotics Lab. The longest print time for a face shield was 4h 34min (274min) and required 63g of filament, also only a single part from MITRE Corporation. This means that for each MITRE Corporation face shield you could 3D print almost 6 MSD Robotics Lab face shields. This is a big difference if you’re trying to maximise the quantity you produce for your local hospital or health centre. Below you can visually see how different they are, and why there is such a difference in print time and filament use.

Print times vary even more for face masks, with the shortest print time being 2h 14min (134mins) requiring 32g of filament for a 3-part design from Collective Shield (v.0.354). This design is 3D printed in a flat form only 0.6mm thick and then folded into a 3D face mask, often referred to as a “2.5D print.” In contrast, the longest print time for a face mask was 10h 32mins (632mins) with 130g of filament required to print 26 separate parts, forming a respirator style mask called Respirator V2 from Maker Mask. Both of these different designs can be seen below.

Assuming a price for PETG filament of $30/Kg, the cost of 3D printed components for face shields can be calculated to range from $0.33–1.95, while the range of face masks was $0.96–3.90. For one-off products these differences may not be critical to makers, yet when multiplied by hundreds of thousands or even millions (e.g. the IC3D Budmen face shield has been 3D printed over 3 million times!), the potential investment by makers, organisations, charities and businesses may vary significantly based on the selection of one design over another, or one version of a design over another.

If you want to find more of the data and read the detailed analysis, please read the full article here. I look forward to continuing to bring you new analysis of 3D printing during COVID-19.

– Posted by James Novak

3D Printing and COVID-19 in Data

Figure 2 Timeline

Following my previous post discussing some of the opportunities and challenges of using 3D printing to fill supply chain holes during COVID-19, I’m pleased to share the more detailed research I’ve been working on that supported my article in The Conversation.

Published here in an open access journal is an analysis of all 3D printing projects that were initiated during the first months of the pandemic. As a summary, the image above shows the timeline of these projects, and the types of products that were being produced. In total, 91 projects were documented in my research, with only 7 of these occurring before the World Health Organization (WHO) declaration of a pandemic on March 11. Most of these were based in Asia. The remaining 84 projects (92%) followed the declaration as the pandemic spread around the world and health systems rapidly struggled to meet the demand.

The figure above also shows that 60% of projects were for personal protective equipment (PPE) such as face shields and goggles, while 20% were for ventilator components, and a further 20% were for miscellaneous projects such as hands-free door openers.

200523 3D Print COVID-19 Data

Of the PPE projects, 62% were for face shields as shown above in the left chart. This includes the popular Prusa RC3 face shield pictured in my previous post, although the first documented face shield actually occurred on February 25 from The Hong Kong Polytechnic University. Obviously face shields are a relatively low risk product compared to components for a ventilators, and makers could easily 3D print these on desktop 3D printers.

The chart on the right above documents the types of 3D printing technologies used for each of the 91 projects. Perhaps it is no surprise that fused filament fabrication (FFF) was the most used, accounting for 62% of projects. Resin printing with stereolithography (SLA) or digital light processing (DLP) was the next most popular for 10% of projects, followed by multi jet fusion (MJF=9%), selective laser sintering (SLS=8%), continuous liquid interface production (CLIP=2%), and concrete was used in one project in China to 3D print concrete isolation houses for Xianning Central Hospital in Hubei. Interestingly, 8% of projects did not specify the 3D printing technology being utilised, suggesting that some projects lacked documentation or were reported by the media simply as “3D printing.”

While this review provides an overview of the broad trends related to the 3D printing of health and medical products during the first months of the COVID-19 pandemic, ongoing research is needed to continue monitoring 3D printed products throughout the pandemic to understand longitudinal trends. For example, does the initial hype from March subside and a more stable pattern of research and collaboration continue through April and the following months? Do projects consolidate and merge, with others ending as regulations tighten, or traditional supply chains stabilise?

It will also be necessary to analyse 3D printed products and validate them, particularly as the health crisis continues for months or even years. Initial 3D printing projects, while well intentioned, were largely unregulated and a reflexive response to direct and immediate needs. As supplies stabilise, and the infection curve flattens, more time and resources can be devoted to research, building upon the NIH 3D Print Exchange database of approved designs, perhaps developing an approved FDA or TGA database of designs as well as 3D print technologies and materials. These may be necessary for any future outbreaks of the virus, as well as allowing for better preparation for future health, humanitarian and natural disaster crises that may require a similarly rapid response to equipment shortages.

If you want to find more of the data and read the detailed analysis, please read the article here. Additionally, you can freely access all of the data I collected for this research, and continue building off it, by accessing it on Figshare. I hope it is useful for building our understanding of how 3D printing can be deployed during a health crisis.

– Posted by James Novak

3D Printed Knits

191115 3D Print Knit

Did you know it’s possible to knit using a desktop 3D printer?

This has been some work I’ve been doing in the background for a little while now and combines all the benefits of digital design with craft-based hand assembly. OK, so you can’t print with soft yarn (yet), but by printing thin geometry you can create some relatively soft and flexible knits that are unlike the typical chainmail assemblies often used in 3D printed fashion/textiles.

The trick to this is to simplify the knit into individual pieces, which can be 3D printed flat on the build plate. This makes printing extremely fast, also known as a 2.5D print which I’ve written about in a previous blog post. While one of the benefits often discussed about 3D printing is the ability to produce complex assemblies as a single part, in the case of a knit, this will result in significant amounts of support material, and the need for quite bulky geometry to ensure the knit geometry is strong enough. However, by printing separate components, these problems are avoided, and you can have some fun manually connecting the loops together while you wait for the next print.

Additionally, the new opportunity of 3D printed knits is to create completely new patterns and geometries in CAD software. This has been the focus of my newly published paper called A Boolean Method to Model Knit Geometries with Conditional Logic for Additive Manufacturing (free to access). In it I detail how to set up an algorithm in Rhino with  Grasshopper that will allow customisation of loop and float structures for a knit, the sort shown in the top picture. If you have some experience with the software, you can follow the process outlined in the paper to set up a similar system, and begin modifying parameters and geometry to create completely new knits that would not be possible using traditional knitting techniques.

191115 Grasshopper 3D Knit

As shown above, the Grasshopper code gets quite complex so is not for the feint of heart, but if you understand boolean logic, and have used Grasshopper, I’m sure you can build this! And if not, have a go at modelling some knit geometry in your favourite CAD package and print it out – you can keep printing on repeat to extend the size of your “knitted” textile, this is how some of my early tests were done. If you start by modelling some rows of circles, then connect them together, this will get you close to a knit structure.

Happy 3D knitting.

– Posted by James Novak

Fingerprint Stool 3D Printed on a BigRep ONE

Fingerprint Stool BigRep ONE

Size matters!

I’ve been throwing out teasers about this project on social media for over a year, and with my research just published in the Rapid Prototyping Journal, it is very exciting to finally be at the finish line and able to share it – all of it! So what exactly is it?

Well, it’s a 3D printed stool. But more than that, it’s the outcome of a design for additive manufacturing case study using the new BigRep ONE 3D printers, housed in the ProtoSpace facility at the University of Technology Sydney. The BigRep ONE is essentially a desktop FDM 3D printer on steroids, with a build volume measuring 1005 x 1005 x 1005mm, that’s over 1 cubic meter of space to 3D print! And much like a desktop FDM printer it uses filaments like PLA, PETG, TPU and realistically just about any other filament material, as well as using a Simplify3D profile for slicing, so designing for the printer and operating it is identical to many common desktop 3D printers.

edfGiven the newness of these machines when they were installed in ProtoSpace in early 2018, my job was to test the capabilities of them whilst developing a showcase product to highlight how they can be used to develop new types of products, and with such a large build volume, furniture was an obvious choice. However, my budget was not unlimited ($1500 AUD) and nor was the time I was allowed to run the printer, which was capped at 5 days so that it was not taken out of commission for other users for more than one working week. Sounds like a generous timeframe unless you’re familiar with just how slow FDM printing is even at the desktop scale, and while this printer is bigger, it is certainly not any faster. And when you are printing for 5 days, this machine will really chew through filament, so that $1500 budget quickly runs out.

In terms of the fingerprint concept, the stool was designed when I was newly engaged and uses a fingerprint from my (now wife’s) ring finger, and my own. Awwwwe… There are few features more unique to each human than a fingerprint, so this concept was also chosen as a truly unique feature that highlights the capacity for 3D printing to be used for one-off personalised products.

The above video helps explain the design and printing process, which essentially involved:

  1. Ink used to take impressions of fingerprints on paper.
  2. Fingerprints digitised using a flatbed scanner.
  3. Fingerprints vectorised in Adobe Illustrator. Exported as DXF files.
  4. DXF files imported into Solidworks CAD software and oriented 420mm apart for the height of the stool.
  5. Manual creation of the 3D geometry.
  6. Export to STL.
  7. Slice in Simplify3D.
  8. 3D print on the BigRep ONE [1mm nozzle diameter, 0.5mm layer height, 5% infill, 2 walls, 3000mm/min print speed]

Sounds nice and straight forward. However, I must admit things did not go this smoothly: Firstly, designing to fit a specific budget and print time required several iterations, with an early version of the design twice as large as the design pictured here. This meant initial cost estimates were in the range of $2194-3882 and print times 117.5-216.1hours – talk about variation! All of this variation is due to experimenting with process parameters like layer height and nozzle diameter for the same design, and was an important learning process that could be taken back into later iterations of the design, which ultimately became smaller.

Fingerprint Stool BigRep Adhesion

Secondly, another obstacle we struggled with was bed adhesion. This is a common problem with desktop machines, however, not normally when printing with PLA. We quickly found that during the first layers, a slight warp or piece of material sticking up would get knocked by the extruder, causing a knock-on effect as the extruder and any material it had collected quickly cause all of the individual sections of the fingerprint to dislodge. Pictured above on the left is the largest section that printed before some material snapped off and somehow caused the nozzle to become entombed in PLA, pictured above on the right. That was an expensive error, new nozzles for the BigRep ONE do not come cheap!

Given the design was intended to print without any need for support material, we eventually had to concede defeat and add a raft. This had the effect of linking all of the initially individual sections of fingerprint together during the first layers, and provided a strong adhesion to the bed. While we could’ve tried all sorts of glues, tapes and other hacks, we didn’t want to resort to these on such a new machine until we had more time to test settings and work with BigRep on a solution. The good news: the raft worked and after 113 hours, and at a cost of $1634 (only slightly over budget), the Fingerprint Stool was complete. The raft did take 1 hour to remove with a hammer and chisel (with a 1mm nozzle there is so much material it cannot be removed by hand), and the surface finish is quite rough – but in my mind this is the charm of FDM, just like a piece of timber has grain and knots that are simply part of the material.

Overall the BigRep ONE is an exciting technology, you just need to keep in mind that due to the scale, all of the small issues you can experience on a cheap desktop machine are also magnified. However, it is great for producing large-scale functional parts like furniture, or any of the other examples you may have seen from BigRep in 3D printing news over recent months.

This is a brief overview of the project, there is much more technical information and analysis in my paper in the Rapid Prototyping Journal, including metrology data of the final design compared with the 3D file, as well as surface roughness data. I’d love to hear your feedback on the project or your own experiences with the printer if you’ve been lucky enough to use one. And keep an eye out for updates about the stool appearing in an exhibition later in the year 😉

UPDATE: Thank you to BigRep for taking an interest in this project and writing their own story about it here, and to 3D Printing Industry for also sharing this story.

– Posted by James Novak