The Rise of 3D Printed Prosthetic Eyes

Recently there’s been quite a lot of attention on the use of 3D printing to manufacture artificial eyes (aka. ocular prostheses). This has largely been due to an announcement out of the UK that the world’s first 3D printed artificial eye was implanted in a patient.

Quite a cool milestone and application of 3D printing, and also happens to be a field I’ve been investigating for the past 6 months with some of my colleagues at the Herston Biofabrication Institute. We’ve just published a review of all research into the use of 3D printing for orbital and ocular prostheses, and you can access the full article for free here.

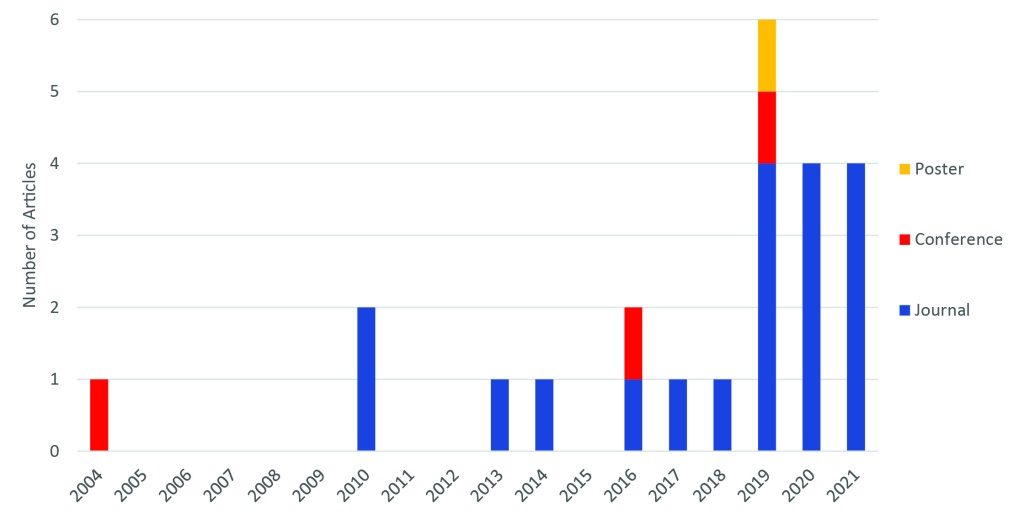
The graph above does a nice job of showing the overall trend for research on this topic, with the first ever paper dating back to 2004. Early studies like this certainly weren’t 3D printing eyes and implanting them in patients, but instead used 3D printing as part of the process, creating moulds and similar devices. The first time a 3D printed part was directly used as part of a prosthesis was in 2014.

Perhaps one of the best ways to demonstrate what is possible now using full-colour 3D print methods (material jetting) is the below video from Weta Workshop. While these may be eyes for monsters, the same principle is being used for human prosthetic eyes. One of the key differences between what Weta Workshop have achieved, and what is being done for patients, is the need for biocompatible materials, as well as the need for a patient’s eye to perfectly match their existing “good” eye.

While it’s early days in the clinical trial phase of implementing 3D printing for prosthetic eyes, there are many benefits which we summarised from our research, including:

  • Manual steps in prosthesis fabrication can be replaced by digital methods, potentially saving time
  • Less discomfort to patients through use of medical imaging or 3D scanning techniques
  • Weight reduction compared to traditional methods
  • Improved accuracy and fitting of prosthesis
  • Minimised need for gluing a prosthesis to the skin
  • Good realism of eye
  • Ability to easily re-print the same components in the future

Of course, there are currently some limitations as well, such as:

  • End-use 3D printed parts are typically not biocompatible and require coating with PMMA or used as a mould to cast with biocompatible material (although the UK trial shows that direct 3D printing of multi-colour biocompatible materials may be possible)
  • Experience in computer-aided design (CAD) technology is required, which is not part of traditional skillset for prosthetist
  • AM times are slow (although they can also happen overnight or while a specialist does other things)
  • Rough surface quality of parts requires additional post-processing e.g. polishing
  • Challenges associated with using 3D scanners e.g. patient movement or scanning anatomy with hair
  • Expert manual skills are still required for some steps of the workflow
  • Use of CT scanning for the purposes of creating a prosthetic increases patient exposure to potentially harmful radiation

Research to-date has been limited to small case studies and engineering experiments, making it difficult to understand whether outcomes will translate to the clinical context. It will be great to see how the UK clinical trial progresses, and hopefully provides improved outcomes for patients. Let’s watch this space!

– Posted by James Novak

From bespoke seats to titanium arms, 3D printing is helping Paralympians gain an edge

Jeff Crow/AAP Image

Authors: James Novak, The University of Queensland | Andrew Novak, The University of Technology Sydney

** Please note: this is a copy of an article I wrote for The Conversation, published on 3rd September, 2021, and is shared under a CC-BY-ND license. You can access the original article by clicking here.**

Major sporting events like the Paralympics are a breeding ground for technological innovation. Athletes, coaches, designers, engineers and sports scientists are constantly looking for the next improvement that will give them the edge. Over the past decade, 3D printing has become a tool to drive improvements in sports like running and cycling, and is increasingly used by paralympic athletes.

The Paralympics features athletes with a diverse range of abilities, competing in a wide range of different categories. Many competitors use prosthetics, wheelchairs or other specialised components to enable them to perform at their best.

One interesting question is whether 3D printing widens or narrows the divide between athletes with access to specialised technologies, and those without. To put it another way, does the widespread availability of 3D printers — which can now be found in many homes, schools, universities and makerspaces — help to level the playing field?

Forget mass production

Mass-manufactured equipment, such as gloves, shoes and bicycles, is generally designed to suit typical able-bodied body shapes and playing styles. As such, it may not be suitable for many paralympians. But one-off, bespoke equipment is expensive and time-consuming to produce. This can limit access for some athletes, or require them to come up with their own “do-it-yourself” solutions, which may not be as advanced as professionally produced equipment.

3D printing can deliver bespoke equipment at a more affordable price. Several former paralympians, such as British triathlete Joe Townsend and US track athlete Arielle Rausin, now use 3D printing to create personalised gloves for themselves and their fellow wheelchair athletes. These gloves fit as if they were moulded over the athlete’s hands, and can be printed in different materials for different conditions. For example, Townsend uses stiff materials for maximum performance in competition, and softer gloves for training that are comfortable and less likely to cause injury.

3D-printed gloves are inexpensive, rapidly produced, and can be reprinted whenever they break. Because the design is digital, just like a photo or video, it can be modified based on the athlete’s feedback, or even sent to the nearest 3D printer when parts are urgently needed.


Read more: Paralympians still don’t get the kind of media attention they deserve as elite athletes


Harder, better, faster, stronger

An elite athlete might be concerned about whether 3D-printed parts will be strong enough to withstand the required performance demands. Fortunately, materials for 3D printing have come a long way, with many 3D printing companies developing their own formulas to suit applications in various industries – from medical to aerospace.

Back in 2016, we saw the first 3D-printed prosthetic leg used in the Paralympics by German track cyclist Denise Schindler. Made of polycarbonate, it was lighter than her previous carbon-fibre prosthetic, but just as strong and better-fitting.

With research showing sprint cyclists can generate more than 1,000 Newtons of force during acceleration (the same force you would feel if a 100-kilogram person were to stand on top of you!), such prosthetics need to be incredibly strong and durable. Schindler’s helped her win a bronze medal at the Tokyo games.

Denise Schindler on her way to a medal in Tokyo. Thomas Lovelock

More advanced materials being 3D printed for Paralympic equipment include carbon fibre, with Townsend using it to produce the perfect crank arms for his handbike. 3D printing allows reinforced carbon fibre to be placed exactly where it is needed to improve the stiffness of a part, while remaining lightweight. This results in a better-performing part than one made from aluminium.

3D-printed titanium is also being used for custom prosthetic arms, such as those that allow New Zealand paralympian Anna Grimaldi to securely grip 50kg weights, in a way a standard prosthetic couldn’t achieve.

Different technologies working together

For 3D printing to deliver maximum results, it needs to be used in conjunction with other technologies. For example, 3D scanning is often an important part of the design process, using a collection of photographs, or dedicated 3D scanners, to digitise part of an athlete’s body.

Such technology has been used to 3D-scan a seat mould for Australian wheelchair tennis champion Dylan Alcott, allowing engineers to manufacture a seat that gives him maximum comfort, stability and performance.

3D scanning was also used to create the perfect-fitting grip for Australian archer Taymon Kenton-Smith, who was born with a partial left hand. The grip was then 3D-printed in both hard and soft materials at the Australian Institute of Sport, providing a more reliable bow grip with shock-absorbing abilities. If the grip breaks, an identical one can be easily reprinted, rather than relying on someone to hand-craft a new one that might have slight variations and take a long time to produce.


Read more: 3 reasons why Paralympic powerlifters shift seemingly impossible weights


All these technologies are increasingly accessible, meaning more non-elite athletes can experiment with unique parts. Amateurs and professionals alike can already buy running shoes with 3D-printed soles, and 3D-printed custom bike frames. For those with access to their own 3D printer, surf finscycling accessories and more can be downloaded for free and printed for just a few dollars.

However, don’t expect your home 3D printer to be making titanium parts anytime soon. While the technology is levelling the playing field to a certain extent, elite athletes still have access to specialised materials and engineering expertise, giving them the technological edge.


This article was co-authored by Julian Chua, a sports technology consultant at ReEngineering Labs and author of the Sports Technology Blog.

3D Printed Prosthetic Research

As a university researcher, it often takes a long time until I can actually share my work publicly. As a result this blog often only tells part of the story, for example I recently posted about 3D printing a prosthetic hand by e-NABLE. What I didn’t say is that this was part of research into adapting the design to perform different tasks. Recently undergraduate product design student Cory Dolman worked with me to prototype some new concepts, and his work has been picked up by UTS who created this great video about his process and the ideas we’ve been bringing to life. You can also read all the details on his blog which was maintained during the project with me here.

For anyone who is yet to realise the opportunities of 3D printing technology, hopefully this video goes some way to showing how quickly designers like Cory and myself are able to iterate designs, constantly testing our ideas and expediting the design process. We hope that as we refine these designs, we will be able to share them back into the e-NABLE community, and allow anyone with access to a 3D printer to not only benefit from the prosthetic, but also continue to iterate and improve it collaboratively. This is what excites me about 3D printing – it’s not just about the technology, but what it enables.

– Posted by James Novak

Oh That’s Handy – 3D Printed Prosthetic

20180114_e-Nable Prosthetic Hand

If you’ve been paying any attention to 3D printing over recent years, no doubt you’ve seen at least a few 3D printed prosthetics. From the Iron Man prosthetic arm to the prosthetics being 3D printed for our animal friends, 3D printing is ushering in a new generation of low-cost, customisable prosthetics. Perhaps you’ve even seen my build of the fully robotic InMoov hand which has been documented on this blog.

At the extremely affordable end of the spectrum for humans, Enabling the Future (also called e-NABLE) is one of the most well-known names, developing a range of  open source prosthetics since 2013, which can be freely downloaded, printed, assembled and sent off to those in need. As part of my research I have wanted to build one of the e-NABLE hands for a while now to understand more about them, particularly in comparison to the more complex InMoov robot arm. As pictured above, I’ve finally got around to printing the Phoenix v2 hand, which is wrist actuated to open/close the fingers.

When you look at all the details, it really is a clever design which is optimised for 3D printing on a desktop FDM machine, with almost no support material or waste, and tolerances that fit really well together. Anyone with a 3D printer could assemble one of these, most of the non-3D printed parts can be sourced at a local hardware store or found in your shed (screws and fishing line). The instructions are very clear, and there are loads of videos to help demonstrate the assembly process and how some of the technical aspects of the hand work. Because I printed in ABS rather than PLA plastic, the only small hurdle I had was in the thermoforming process of the gauntlet (the bent white piece that mounts to the users arm), which required me using a strip heater in the university workshop. If you find yourself in a similar situation, you can check out the details which were posted in one of my previous posts. However, I recommend using PLA if you have the choice to make this part easier, only requiring some boiling water as demonstrated in this video. In itself, this is a really cool technique that I will use in the future to create stronger parts; you can always learn a lot from 3D printing other people’s designs.

Overall the e-NABLE community really has done a great job in refining this design over the years, and I’m already working on some of my own iterations which will hopefully be fed back into the e-NABLE community in the future. If you’re looking for a project to build and learn from, or potentially getting involved in the community and building hands for people in need, Enabling the Future is definitely worth researching.

– Posted by James Novak

Thermoforming 3D Prints

20171113_Thermoform 3D Print

Sorry for the blogging silence, this is the longest break I’ve had since starting a number of years ago. Long story short I’ve made a big move recently for work and am only just starting to get back into printing and making new projects. If you follow my social media, you’ve probably noticed some new things starting!

One of the projects I’ve wanted to play with since previously building the InMoov robot arm is the Enabling the Future prosthetics (aka. e-NABLE). This week I 3D printed and built most of the Phoenix v2 hand, which of course is open source and free to download. A really inspiring company, and a vastly more simple design compared to the electronic InMoov! Some of the pieces, which I printed on an UP Mini 2 in ABS plastic, can be seen above. I’ll post full details once I get it up and running, just waiting on some elastics for the fingers. The gauntlet piece, which attaches to the users forearm, is printed in a flat position and then bent into a C shape afterwards. This is a really clever idea for providing the strongest functional part with optimal layer orientation. But how do you bend a 3D print?

Well the instructions from e-NABLE require dipping the piece in boiling water for a few seconds to make it pliable – if you 3D print in PLA, which has a lower melting temperature than ABS. Check out the video here. However ABS is not really going to be affected by boiling water, and just to make sure I did try this technique with my first print. It did get a bit of a bend, but mostly a snap!

For print #2 I instead found myself a strip heater in the workshop, which is perfect for heating a nice clean line and normally used to bend acrylic sheets. A few seconds on each side of the print and it bent perfectly without de-lamination or splitting, and was easy to re-heat to make small adjustments to fit with the hand print. This is a technique I’d never thought of using, but has really given me a lot of ideas for creating 3D prints which are post-processed like this into a stronger shape than if they were 3D printed in their final more complex form. I think some of the simple enclosures I’ve made in the past could be much stronger if considered more like a sheet-metal part, although then this begs the question why not just laser cut the design? Well in the case of this e-NABLE prosthetic, there are some 3D details for snapping in other pieces, which could not be done using a 2D process like laser cutting. This would be important to consider if using this process with 3D printing, but it’s certainly an interesting technique worth further experimentation.

If you’ve done something like this yourself, or have ideas for thermoforming a 3D print, leave me a comment.

– Posted by James Novak

InMoov Custom Mobile App

It’s been a while since posting about the InMoov robot hand I started building last year. Previously I had everything assembled and was using some direct controls in Grasshopper (plugin for Rhino) to test and tweak the movements of the fingers and wrist (click here to see the last video). That was fun, but not as fun as being able to control the fingers wirelessly from across the room!

Using MIT App Inventor, I’ve created a very basic mobile app that now allows the fingers and wrist to be controlled on my phone using a Bluetooth connection to the Arduino board. It’s nothing fancy right now, just some simple sliders that control the servos, but now that the basics are working some more automated movements could be set up eg. by using the built-in sensors of the phone, movements could be controlled by simply tilting the phone.

20161203_InMoov Display

In order to display the working InMoov hand at the CreateWorld Conference last year, I  also built a display box from plywood since the arm is not really attached to anything and there are a lot of electronics dangling around that are a bit too messy for display. It actually makes moving the hand around and working on it quite a bit easier now since it’s raised up as well. If I had files for this case I would share them, but I went old-school for this one and just created it freehand with a jigsaw – I’m not completely reliant on digital manufacturing (yet!). Inside the box on the right are all the messy electronics, and a hole for the Arduino USB cable to reach through to connect to computer when needed.

I’ve also 3D printed a stamp with my name and the edditive logo to “tag” this project. Using 3D printing to make custom stamps is something I wrote about in one of my first ever blog posts, click here to take a trip back in time. It’s always the little details that bring a project to life for me.

– Posted by James Novak

InMoov Robot Hand First Prints

20160812_InMoov 3D Prints

If you’re already following my Instagram you’ve had a sneak peek at one of my side projects – to build the arm/hand for the InMoov robot. No small project! InMoov is the world’s first open-source 3D printable life-size robot, and you can find some excellent instructions and all the files on the InMoov website, a fantastic credit to Gael Langevin the creator of this robot.

Above you can see the first 3D prints I’ve completed for the arm, all printable even on the small print bed of the UP Plus 2. Some of the prints are also done on my Cocoon Create. At a guess it’s taken about 25-30 hours of print time to get the parts shown above, and there are still plenty more to go, so this isn’t a project for the feint of heart. But it is a great challenge that combines 3D printing with electronics and some understanding of mechanics, like an advanced version of Lego.

20160814 InMoov Details

There are other similar open-source projects out there, such as Open Bionics or e-NABLE, but I chose the InMoov because the instructions seem really clear and detailed (very important for a build like this!), and there is a good level of complexity in the movements of the hand. Check out this video to see some of the movements. Hopefully once I get the hand up and running I can have a play around with the design and the method of controlling the hand, but for now it’s just about getting the hand built and working. Keep an eye out for the progress, hopefully with some of the electronics installed once the servo’s arrive from China.

– Posted by James Novak

Giving the Finger to 3D Printed Prosthetics

20160410_Prosthetic Finger

I’ve always wanted to try 3D printing one of the great open source prosthetic hands that frequently pop up in my news feed, and I have finally found an excuse, and a little bit of time, to dip my toes in the water with this prosthetic finger. This is the freely available Owen Replacement Finger, available from the well known 3D printed prosthetic company Enabling the Future. While the design is admittedly quite clunky, it does work, and it is somewhat customisable using the Customizer feature of Thingiverse to fit your hand/finger dimensions.

All the pieces printed in 2-2.5 hours on my Cocoon Create printer, with only a couple of the small details not printing correctly (in particular the guides for the fishing line on the back plate). But nothing critical. Add a small length of elastic cord and some fishing line and you have a basic moving finger. Many of the parts are designed to be fixed to a glove so that when you clench your fist, the finger bends, but for now I’m not interested in creating an extra finger for myself or anything – it’s just a trial as I lead into a research collaboration at university to look at finger prosthetics for some real life patients.

From this small print I can see why the full prosthetic hands make a great project – it’s fun to bring something like this to life with movement that begins to replicate our own human anatomy. Hopefully there will be more like this to come!

– Posted by James Novak