Customising Surf Fins for 3D Printing

Early followers of this blog may be familiar with several projects to 3D print kiteboard and stand up paddle (SUP) board fins, including some fins you can freely download if you’re into kitesurfing. It’s been a little while between posts on this topic, however, I have been busy in the background producing a system to help people with no CAD experience design and customise their own fins ready for 3D printing. The full details have just been published in the Computer-Aided Design and Applications Journal.

Quite a few people have used 3D printing to produce surf fins – after all, it’s very cheap and means you can produce just about any geometry you like. Researchers have looked at the strength of different materials and 3D printing technologies for this application, as well as the performance (fluid dynamics) of different geometries. However, if you are not a relatively advanced CAD user, it is unlikely you will be able to design the fin of your dreams, no matter how awesome the research suggests 3D printing can be! This is what I was interested in solving.

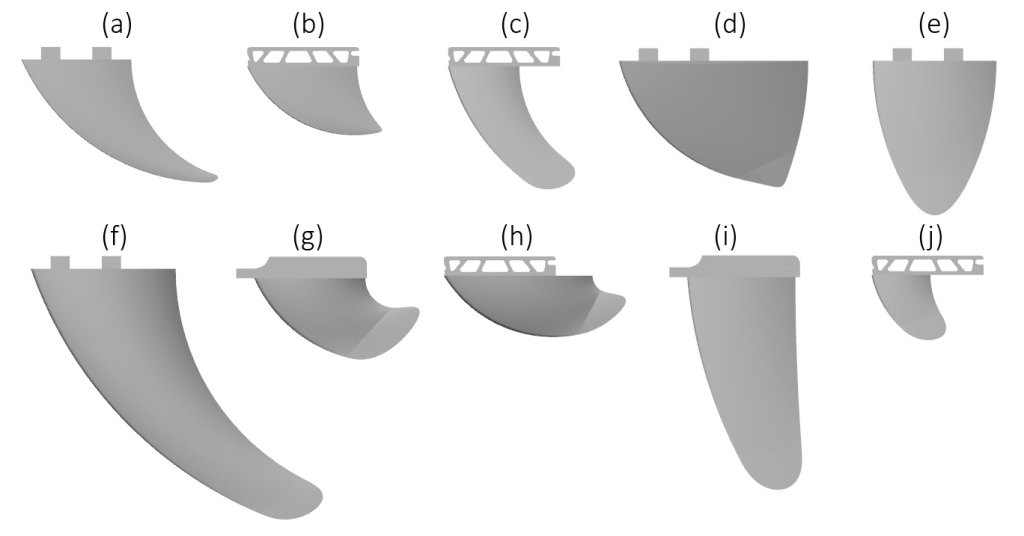
Using Rhinoceros and Grasshopper, the complexity of a fin was condensed down to a series of limited controls that allowed for freeform experimentation. The above image is the interface that allows surfers to customise a fin design in real-time. It is based on a handful of common fin properties such as the fin system, fin position on the board, cant, fin depth, sweep, base length, base foil profile, tip sharpness and tip thickness, all of which can be modified using some simple sliders or dropdown menus. Feedback is also provided in the form of overall dimensions and volume. From the image at the top of the page, you can get a sense for the wide variation in designs possible from this simple interface.

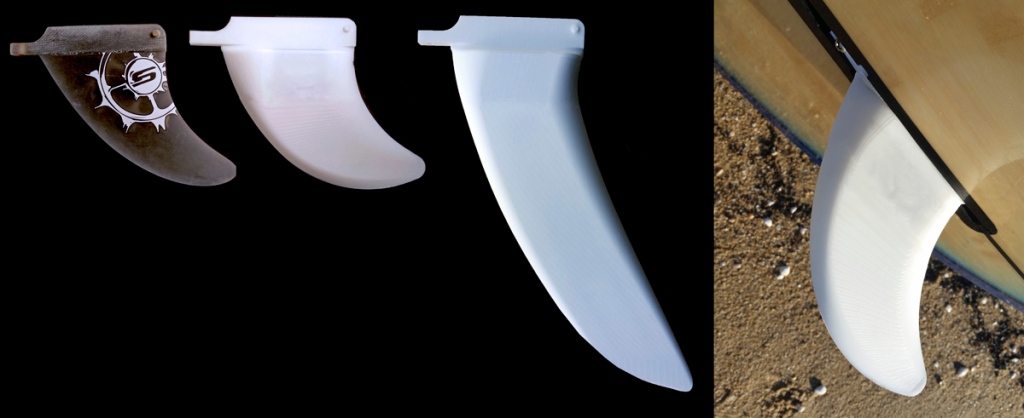
Once you’re happy with the design it can be exported ready for 3D printing. I’ve 3D printed a couple of different designs for testing on my SUP board, the smaller white fin in the image above being 3D printed using FDM, while the larger fin was 3D printed using selective laser sintering (SLS). Both worked well in flat water paddling, although I’m sure some carbon fibre would give me a bit more confidence heading into the surf.

Hopefully some more to come soon as spring and summer approach.

– Posted by James Novak

3D Printed Knits

191115 3D Print Knit

Did you know it’s possible to knit using a desktop 3D printer?

This has been some work I’ve been doing in the background for a little while now and combines all the benefits of digital design with craft-based hand assembly. OK, so you can’t print with soft yarn (yet), but by printing thin geometry you can create some relatively soft and flexible knits that are unlike the typical chainmail assemblies often used in 3D printed fashion/textiles.

The trick to this is to simplify the knit into individual pieces, which can be 3D printed flat on the build plate. This makes printing extremely fast, also known as a 2.5D print which I’ve written about in a previous blog post. While one of the benefits often discussed about 3D printing is the ability to produce complex assemblies as a single part, in the case of a knit, this will result in significant amounts of support material, and the need for quite bulky geometry to ensure the knit geometry is strong enough. However, by printing separate components, these problems are avoided, and you can have some fun manually connecting the loops together while you wait for the next print.

Additionally, the new opportunity of 3D printed knits is to create completely new patterns and geometries in CAD software. This has been the focus of my newly published paper called A Boolean Method to Model Knit Geometries with Conditional Logic for Additive Manufacturing (free to access). In it I detail how to set up an algorithm in Rhino with  Grasshopper that will allow customisation of loop and float structures for a knit, the sort shown in the top picture. If you have some experience with the software, you can follow the process outlined in the paper to set up a similar system, and begin modifying parameters and geometry to create completely new knits that would not be possible using traditional knitting techniques.

191115 Grasshopper 3D Knit

As shown above, the Grasshopper code gets quite complex so is not for the feint of heart, but if you understand boolean logic, and have used Grasshopper, I’m sure you can build this! And if not, have a go at modelling some knit geometry in your favourite CAD package and print it out – you can keep printing on repeat to extend the size of your “knitted” textile, this is how some of my early tests were done. If you start by modelling some rows of circles, then connect them together, this will get you close to a knit structure.

Happy 3D knitting.

– Posted by James Novak

Organic Models Grown in Grasshopper

During November 2017 I was lucky enough to be involved in a 2-day workshop run by Lionel Dean from Future Factories. Lionel has been working with 3D printing for many years, and his work is very inspirational – I’d recommend taking a look at his projects which all use algorithms to generate complex, one-off products often 3D printed in precious metals like gold. The projects really highlight the capabilities of 3D printing and push the boundaries of what is possible.

The workshop focused on using Grasshopper, which runs as a plugin for the 3D modelling software Rhino. If you’ve been following this blog for a while you’ve probably seen a few videos and demonstrations as I’ve been learning the program, including my successful Kickstarter earlier this year. The video above is the final simulation produced by the end of the workshop, which was an exploration of mimicking natural growth processes, similar to a sprouting seed. It’s not perfect, but definitely highlights the opportunities of using algorithms to design, as opposed to manually creating a singular static form. In Lionel’s work, he often uses these forms of growth to allow people to essentially pause the simulation and have the particular “frame” 3D printed as a custom object.

20171220 Grasshopper Code

For any fellow Grasshopper geeks, above you can get an idea of the code used to generate these sprouts. There is no starting model in Rhino, it is entirely built from this code. Hopefully this will influence some future projects…

– Posted by James Novak

3D Printed Metamorphosis

20170819_3D Butterfly

**Details of this research can be found in the Design-4-Health Conference Proceedings**

3D printing insects and creatures is nothing new, but maybe the months written on the image above indicates something more is going on with these 3D prints…

The 3D models of the caterpillar and butterfly are in fact generated by monthly step data collected on my old Garmin Vivofit – no design (or designer!) required. This is all an experiment to explore how non-designers may be able to use 3D printers without needing to learn complex CAD software, or sit on websites like Thingiverse and download random things just for the sake of printing. With the proliferation of activity trackers and smart watches gathering this data, perhaps there are creative ways for software to generate rewards from this data, which can be sent to a 3D printer and turned into something tangible?

Garmin Steps

I won’t go into all the details and theories right now, this work will be presented at the Design 4 Health conference in Melbourne this December. Visitors will even be able to input their own daily, monthly or yearly step goals, along with their actual steps achieved, and generate their own rewards. This is all controlled in Rhino with Grasshopper using some tricky parametric functions to automatically grow a caterpillar into a butterfly; if the steps achieved are below the goal, you will have a caterpillar, with the number of body segments growing depending on the percentage of achievement towards the goal. If the goal has been exceeded, a butterfly will emerge and grow bigger and bigger as the steps achieved continue to increase over the goal. You can see the results for a number of months of my own data tracking in the image above.

The 3D prints are being done in plastic for the exhibition, the examples above done on UP Plus 2‘s, however there’s no reason a future system couldn’t use chocolate or sugar as an edible reward for achieving your goals! I think it will take some interesting applications of 3D printers such as this to ever see a 3D printer in every home as some experts have predicted. But as anyone with a 3D printer knows, it will also take far more reliable, truly plug-n-play printers to reach this level of ubiquity. Time will tell.

– Posted by James Novak

Mashup-Yoda – Download For Free

Yoda Header

Recently I wrote a step-by-step tutorial for my friends at Pinshape about how you can use free software (Meshmixer) to combine downloaded STL files into your own unique design – this is called a mashup, or a remix. The tutorial is nice and easy to follow, and was just the start of my plan to create some really interesting designs in a series of mashups. You can find a full video tutorial and links to the written tutorial in my previous post.

Finally I’ve found some time to create mashup number 2, Mashup-Yoda! This design has taken a lot more time to create in Meshmixer, along with learning some of the more advanced tools and plenty of trial-and-error along the way. However it is based on a similar idea as the Mashup-Rex from the tutorial, combining a skeleton element with an external skin to give a cutaway effect to the creature. However, what might Yoda’s skeleton look like?

Yoda's_death

As you (hopefully) know from the film Return of the Jedi, Yoda’s body vanishes as he becomes one with the force in his death, so there is no way to know. But upon finding the Voronoi Yoda model by Dizingof on Thingiverse, it seemed like an interesting concept for this powerful Jedi, perhaps a more organic internal skeleton that was formed by the Midi-chlorians (some real Star Wars nerd talk!) that gave Yoda his power.

Nerd talk aside, as much as anything the Voronoi Yoda just seemed like a cool model that would be fun to combine with a realistic bust of Yoda, also available freely on Thingiverse. The 2 models are a great fit, with the main challenge being the slicing and dicing of the geometry in Meshmixer to create this organic looking, almost cyborg-like Yoda mashup. Mostly this has been achieved using the Sculpt tools and the Select tool to remove sections of the models and re-shape them to look like they were designed this way from the beginning.

20170625_Mashup-Yoda

I’ll admit that I did have some problems combining the 2 models into a single STL file right at the end in Meshmixer, probably due to the weird intersections between the models where I had pushed and pulled surfaces too far into a non-manifold object. I also ended up with a file size of about 87MB, a bit ridiculous for sharing online, and the normal reduction techniques in Meshmixer were just destroying the quality of the surfaces. So I ended up bringing the large STL file into Rhinoceros, reducing the mesh by about 75%, exporting as a STL, importing back into Meshmixer, using the Inspector tool to repair any little remaining errors automatically, and finally exporting a clean, 3D printable STL file. That’s a mouthful!

Now that the hard work’s been done, I’d love you to have this model for free so you can print it out, or even get crazy and try remixing my remix using some of the techniques shown in my Pinshape tutorial! I’ve uploaded it to my favourite 3D file sharing websites Pinshape, Thingiverse, 3D File Market and Cults. Choose your website, 3D print and share some photos 🙂

May the force be with you

– Posted by James Novak

InMoov Custom Mobile App

It’s been a while since posting about the InMoov robot hand I started building last year. Previously I had everything assembled and was using some direct controls in Grasshopper (plugin for Rhino) to test and tweak the movements of the fingers and wrist (click here to see the last video). That was fun, but not as fun as being able to control the fingers wirelessly from across the room!

Using MIT App Inventor, I’ve created a very basic mobile app that now allows the fingers and wrist to be controlled on my phone using a Bluetooth connection to the Arduino board. It’s nothing fancy right now, just some simple sliders that control the servos, but now that the basics are working some more automated movements could be set up eg. by using the built-in sensors of the phone, movements could be controlled by simply tilting the phone.

20161203_InMoov Display

In order to display the working InMoov hand at the CreateWorld Conference last year, I  also built a display box from plywood since the arm is not really attached to anything and there are a lot of electronics dangling around that are a bit too messy for display. It actually makes moving the hand around and working on it quite a bit easier now since it’s raised up as well. If I had files for this case I would share them, but I went old-school for this one and just created it freehand with a jigsaw – I’m not completely reliant on digital manufacturing (yet!). Inside the box on the right are all the messy electronics, and a hole for the Arduino USB cable to reach through to connect to computer when needed.

I’ve also 3D printed a stamp with my name and the edditive logo to “tag” this project. Using 3D printing to make custom stamps is something I wrote about in one of my first ever blog posts, click here to take a trip back in time. It’s always the little details that bring a project to life for me.

– Posted by James Novak

Robot Picasso Kickstarter Final Week!

The final week of my very first Kickstarter campaign is now here, and to celebrate I’ve put together a brand new video demonstration of what Robot Picasso can do. This time, rather than using the Solidoodle 3D printer to draw on paper as in the first video, this demonstration shows how you can collaborate with Robot Picasso and use the digital DXF file of your custom artwork to import into software like Adobe Illustrator. From there anything’s possible, including using the design to laser cut into any material!

robot-picasso-laser-cut

It’s been an exciting roller coaster so far, and the hard work is yet to begin making and shipping all the artworks. It’s been challenging being overseas for nearly 2 weeks on a pre-booked holiday – I haven’t been able to spend as much time as I wanted promoting and creating regular updates for the campaign. However it was also quite eye-opening to realise just how much can be done with a laptop and internet connection – the video demonstration was completely created from my hotel in Hawaii, giving you an idea of how versatile Robot Picasso really is. You can receive your own custom DXF file for just $15 AUD, and have it included in the eBook compilation which all backers receive. Great if you are digital savvy and have access to some cool toys like plotters, laser cutters, routers etc.

Please help me to share this campaign on social media, it would be awesome to reach 50 backers over this final week (currently at 32) and increase the amount of artwork in the eBook. If you’re not into getting a custom drawing, you can buy the eBook for just $8 AUD and have it emailed to you after all drawings have been produced. See if you can figure out what each drawing is!

– Posted by James Novak

My First Kickstarter Goes Live!

I don’t normally use my blog to promote or sell anything, but I figure for the launch of my first Kickstarter campaign I can make a small exception! Besides, it’s actually developed from some of my previous posts where I hacked my useless Solidoodle Press 3D printer to draw images and had some fun using a Wii Nunchuck controller to manually move the extruder.

Through the month of January Kickstarter are running the Make 100 Challenge, and I was inspired to set something up quickly that would be a bit of fun for both myself and potential backers. The idea of the challenge is to get something off the ground that is limited to 100 editions, so it’s inspiring to see a lot of new projects that might not normally launch on Kickstarter, many of them quite creative and artistic. That’s where I’ve pitched my Kickstarter – something a bit unusual and creative, yet fitting in with my interests of customization, hacking, digital manufacturing, algorithms, coding, parametric design, CAD… All the fun stuff.

On paper the idea is relatively simple – send me a photograph, I use some software to generate a Picasso-like line drawing, and that drawing gets sent to my hacked Solidoodle Press to be drawn on paper. But hopefully the video shows that the process is a little more complex than that, and quite interesting to watch.

I would love you to take a look, share the link, or if you’re really interested help get this project off the ground with funding levels starting at only $8 for the final eBook compilation. Whatever happens it’s been a great experience to put this campaign together.

– Posted by James Novak

22/1/2017 UPDATE: To thank everyone for your support and reaching the 200% funding milestone, here’s a new short video showing what happens when Robot Picasso draws a cliff-top building.

Robot Picasso also has a new Facebook Page you can follow to keep up to date with the latest developments. Let’s keep the momentum of this campaign and try and get 100 unique drawings!

InMoov Comes to Life

Look! It’s moving. It’s alive. It’s alive… It’s alive, it’s moving, it’s alive, it’s alive, it’s alive, it’s alive, IT’S ALIVE! – Frankenstein.

Yes finally the InMoov robot arm I’ve been slowly printing and assembling is complete and functioning with only the occasional little hiccup. I thought I was really close in my last post where I had assembled all the 3D prints and electronics, but it is definitely the last 10% that takes the most work.

Tensioning the braided lines just right and tying them to the servo’s is a painstaking task, especially in the heatwave we’ve been having in Australia, where you’re trying to resist the urge to wipe sweat from your face while you tie the knot just right… I felt a bit like a surgeon out in a humid jungle performing emergency surgery. A few little broken bits along the way as well from prints splitting or glue not holding, so it’s a relief to finally iron out all the kinks and start playing with the controls.

As you’ll see in the video, I’m using Grasshopper (plugin for Rhino) with the addition of Firefly to control the hand movements at the moment – if you’ve followed my blog for a while you’ve seen multiple demo’s of this software and why I think it’s so good, so I won’t bore you here (if you’re interested check out my project which was displayed at Design Philadelphia 2015). But it basically means I can manually adjust the servo’s in real-time using a simple slider for each finger, or connect fingers to the one slider to control them all at once and create a fist for example. It really makes those final tweaks to the servos easy.

I hope you enjoy seeing this arm come to life – it’s quite inspiring when you see it in real life, especially if you’re familiar with 3D printing and the time it takes just to print all of these parts. Now I can finally start modifying this project and experimenting with the controls, the build is only just the beginning for this robot.

– Posted by James Novak

InMoov First Twitches of Life

20160820_InMoov Arm Servo

The 6 servo’s needed to build the InMoov robotic arm/hand arrived since my previous InMoov post, and are now installed and working individually. All up they cost about $35AUD on Ebay. The Meshmixer hack for the stands I discussed in the last post also worked quite well, and luckily no other stands to mount the servo’s have needed re-printing – just a few spots of super glue to prevent any minor splitting between the printed layers. This means that most of the assembly of the arm and wrist is now complete, other than running all the lines to control the fingers (a big job I’m not looking forward to). Below is a video of the wrist movement using a MG 996 servo – sounds like it means business!


Nothing particularly exciting just yet, although it’s nice to see the InMoov showing the first signs of life (Frankenstein anyone?). As you can see I’ve connected this servo to an Arduino Uno, and am manually controlling the movements using Grasshopper and Firefly, both plugins for Rhino 3D CAD software. I’m not sure if any other InMoov makers have done this, but if you’ve followed my blog for a while you’ve probably seen previous demonstrations of how you can use what is essentially a 3D CAD program to control the Arduino in real-time, something I’m very excited about. I certainly aim to continue using this visual programming language (VPL) to interact with the arm, perhaps making it more intuitive and interactive to control. Next step: 3D printing the fingers.

– Posted by James Novak