3D Printing Pop Culture & Viral Objects

20190508 Pop Culture 3D Print

As regular readers of this blog will know, I’ve been involved with 3D printing, making, education and various online communities for a while now. Which is why it’s very exciting to share my latest piece of writing, a book chapter titled “The Popular Culture of 3D Printing: When the Digital Gets Physical” which I wrote with former colleague and fellow maker Paul Bardini from Griffith University.

As the name suggests, the chapter looks at the popular cultural context of 3D printing, rather than the more technical aspects featured in most academic writing. As makers, we are both really interested in the growth of 3D printing and spread of 3D printing files on platforms like Thingiverse, MyMiniFactory and others, so we got a bit scientific and collected some data. The results are very interesting!

Print

Firstly, one of the things we did was collect the total number of files available from a range of 3D printing file repositories, as well as other more general 3D file repositories. Above is the data we collected (on 26th August 2018) which clearly shows Thingiverse to be the largest specific 3D printing file website. This is no surprise given that the website began in 2008, well before most competitors, building a network effect that still seems to be going strong despite some of the most recent challenges Thingiverse has been experiencing. However, there are plenty of other much larger libraries of CAD files that could be searched for 3D printing files, and even though some will be specific to certain CAD software, there’s always a way to make these 3D printable.

Print

Given the size of Thingiverse, we then looked at the most popular designs on the platform, collecting data (you will have to check out the full chapter for this!), and then calculated the average downloads per day for these designs. The graph above shows this data against the date the design was uploaded to the platform. Some of the names you may recognise: #3DBenchy, Baby Groot, the XYZ 20mm Calibration Cube and the Xbox One controller mini wheel. But what does it all mean?

Well, the short story is that objects uploaded to Thingiverse today will be downloaded in higher volumes per day than objects uploaded earlier in Thingiverse’s history. The trend line is increasing, matching the growth of 3D printer ownership; more people are downloading more things, with the Xbox One controller mini wheel recording 700 downloads per day when it was newly released. However, #3DBenchy is by far the most downloaded design of all time, right now having been downloaded over 900,000 times on Thingiverse alone, as well as being available on almost every other 3D file platform. This has lead to our classification of it as a “viral object.” Similar to viral videos and viral media campaigns, a viral object extends these concepts into the physical world through 3D printing, being first spread rapidly through online file sharing communities, then turned into physical objects in their thousands despite each being made in a different location, by a different machine.

This raises some interesting questions:  A viral video or piece of advertising made up of digital bits can easily be deleted, but how do you delete a viral object made up of physical atoms? Simply discarding 3D prints into landfill is unsustainable, and new solutions are necessary that make recycling of 3D prints affordable and accessible to the masses. It is also worth looking at the quantities an object like #3DBenchy is being downloaded and 3D printed, which is clearly in a magnitude similar to injection moulding and the mass production paradigm that 3D printing is supposed to disrupt. While it’s useful to have an object to calibrate and compare 3D printers, it’s also interesting to see that people still want to print and own the same object, rather than being truly individual.

The trend for viral objects is certainly one to watch, and the chapter provides a detailed analysis of this and other emerging trends related to 3D printing and pop culture. If you’re interested in reading the chapter, you may use my author discount code “IGI40” to get a 40% discount, or if you’re at a university you may find you already have access through your library subscriptions. Paul and myself certainly welcome your feedback and thoughts 🙂

– Posted by James Novak

Oh That’s Handy – 3D Printed Prosthetic

20180114_e-Nable Prosthetic Hand

If you’ve been paying any attention to 3D printing over recent years, no doubt you’ve seen at least a few 3D printed prosthetics. From the Iron Man prosthetic arm to the prosthetics being 3D printed for our animal friends, 3D printing is ushering in a new generation of low-cost, customisable prosthetics. Perhaps you’ve even seen my build of the fully robotic InMoov hand which has been documented on this blog.

At the extremely affordable end of the spectrum for humans, Enabling the Future (also called e-NABLE) is one of the most well-known names, developing a range of  open source prosthetics since 2013, which can be freely downloaded, printed, assembled and sent off to those in need. As part of my research I have wanted to build one of the e-NABLE hands for a while now to understand more about them, particularly in comparison to the more complex InMoov robot arm. As pictured above, I’ve finally got around to printing the Phoenix v2 hand, which is wrist actuated to open/close the fingers.

When you look at all the details, it really is a clever design which is optimised for 3D printing on a desktop FDM machine, with almost no support material or waste, and tolerances that fit really well together. Anyone with a 3D printer could assemble one of these, most of the non-3D printed parts can be sourced at a local hardware store or found in your shed (screws and fishing line). The instructions are very clear, and there are loads of videos to help demonstrate the assembly process and how some of the technical aspects of the hand work. Because I printed in ABS rather than PLA plastic, the only small hurdle I had was in the thermoforming process of the gauntlet (the bent white piece that mounts to the users arm), which required me using a strip heater in the university workshop. If you find yourself in a similar situation, you can check out the details which were posted in one of my previous posts. However, I recommend using PLA if you have the choice to make this part easier, only requiring some boiling water as demonstrated in this video. In itself, this is a really cool technique that I will use in the future to create stronger parts; you can always learn a lot from 3D printing other people’s designs.

Overall the e-NABLE community really has done a great job in refining this design over the years, and I’m already working on some of my own iterations which will hopefully be fed back into the e-NABLE community in the future. If you’re looking for a project to build and learn from, or potentially getting involved in the community and building hands for people in need, Enabling the Future is definitely worth researching.

– Posted by James Novak

Thermoforming 3D Prints

20171113_Thermoform 3D Print

Sorry for the blogging silence, this is the longest break I’ve had since starting a number of years ago. Long story short I’ve made a big move recently for work and am only just starting to get back into printing and making new projects. If you follow my social media, you’ve probably noticed some new things starting!

One of the projects I’ve wanted to play with since previously building the InMoov robot arm is the Enabling the Future prosthetics (aka. e-NABLE). This week I 3D printed and built most of the Phoenix v2 hand, which of course is open source and free to download. A really inspiring company, and a vastly more simple design compared to the electronic InMoov! Some of the pieces, which I printed on an UP Mini 2 in ABS plastic, can be seen above. I’ll post full details once I get it up and running, just waiting on some elastics for the fingers. The gauntlet piece, which attaches to the users forearm, is printed in a flat position and then bent into a C shape afterwards. This is a really clever idea for providing the strongest functional part with optimal layer orientation. But how do you bend a 3D print?

Well the instructions from e-NABLE require dipping the piece in boiling water for a few seconds to make it pliable – if you 3D print in PLA, which has a lower melting temperature than ABS. Check out the video here. However ABS is not really going to be affected by boiling water, and just to make sure I did try this technique with my first print. It did get a bit of a bend, but mostly a snap!

For print #2 I instead found myself a strip heater in the workshop, which is perfect for heating a nice clean line and normally used to bend acrylic sheets. A few seconds on each side of the print and it bent perfectly without de-lamination or splitting, and was easy to re-heat to make small adjustments to fit with the hand print. This is a technique I’d never thought of using, but has really given me a lot of ideas for creating 3D prints which are post-processed like this into a stronger shape than if they were 3D printed in their final more complex form. I think some of the simple enclosures I’ve made in the past could be much stronger if considered more like a sheet-metal part, although then this begs the question why not just laser cut the design? Well in the case of this e-NABLE prosthetic, there are some 3D details for snapping in other pieces, which could not be done using a 2D process like laser cutting. This would be important to consider if using this process with 3D printing, but it’s certainly an interesting technique worth further experimentation.

If you’ve done something like this yourself, or have ideas for thermoforming a 3D print, leave me a comment.

– Posted by James Novak

InMoov Comes to Life

Look! It’s moving. It’s alive. It’s alive… It’s alive, it’s moving, it’s alive, it’s alive, it’s alive, it’s alive, IT’S ALIVE! – Frankenstein.

Yes finally the InMoov robot arm I’ve been slowly printing and assembling is complete and functioning with only the occasional little hiccup. I thought I was really close in my last post where I had assembled all the 3D prints and electronics, but it is definitely the last 10% that takes the most work.

Tensioning the braided lines just right and tying them to the servo’s is a painstaking task, especially in the heatwave we’ve been having in Australia, where you’re trying to resist the urge to wipe sweat from your face while you tie the knot just right… I felt a bit like a surgeon out in a humid jungle performing emergency surgery. A few little broken bits along the way as well from prints splitting or glue not holding, so it’s a relief to finally iron out all the kinks and start playing with the controls.

As you’ll see in the video, I’m using Grasshopper (plugin for Rhino) with the addition of Firefly to control the hand movements at the moment – if you’ve followed my blog for a while you’ve seen multiple demo’s of this software and why I think it’s so good, so I won’t bore you here (if you’re interested check out my project which was displayed at Design Philadelphia 2015). But it basically means I can manually adjust the servo’s in real-time using a simple slider for each finger, or connect fingers to the one slider to control them all at once and create a fist for example. It really makes those final tweaks to the servos easy.

I hope you enjoy seeing this arm come to life – it’s quite inspiring when you see it in real life, especially if you’re familiar with 3D printing and the time it takes just to print all of these parts. Now I can finally start modifying this project and experimenting with the controls, the build is only just the beginning for this robot.

– Posted by James Novak

InMoov No Longer InPieces

20161018_inmoov-robot-arm

Over the past couple of months my build of the InMoov robotic arm has continued to progress slowly in the background, until now I find myself near the end. So about time for a little update on the build since my last post where I only had the arm and wrist pieces printed and partially assembled.

Now that the hand and fingers are assembled this is really starting to look cool, with a good range of movement and nice details controlling these movements. Let me say (if I haven’t before) that this is really not a project for the feint of heart – sure you might get lucky and be able to 3D print all of the parts without a hitch (although if you 3D print as much as me you know that for all of these successful prints assembled into the hand, there are many more failures!), but much of the challenge is in having the tools and patience to assemble them together properly. Each joint has needed filing, drilling of holes, gluing, even some acetone to clean up some of the rough surfaces to save reprinting, and of course these processes have been repeated numerous times. But that’s what I love about a project like this, you get to understand how every piece works.

20161021_inmoov-hand-shake

Threading the Spectra braided line (I found a roll of 180lb 0.7mm Spectra quite cheap on Ebay) again requires the patience of a surgeon and a nice pointy set of tweezers, but I’m really loving how I can already start manually controlling the fingers by pulling on the lines. When doing this I found that some of the fingers were stiff and required a lot of force to move, so again you need to be prepared to take things apart and file them down before gluing anything into place, or the servo’s just won’t cope. I’ve found a little bit of lithium grease to be useful to help prevent binding of a few of the joints, but most of them are working quite smoothly without, pinned together with 3mm filament as suggested in the build instructions (so simple if you have access to some of the larger diameter stuff).

Next step is to connect the Spectra lines to the servo’s, which I’ll admit I’ve been nervous about since getting this right is critical, and then it should be up and running! I’ve bought an adjustable power supply to give the servo’s the power they need, seems like they can draw a lot of current when they move, far more than the Arduino/computer can give, so hopefully my next post will have a video of it moving 😀

– Posted by James Novak

InMoov First Twitches of Life

20160820_InMoov Arm Servo

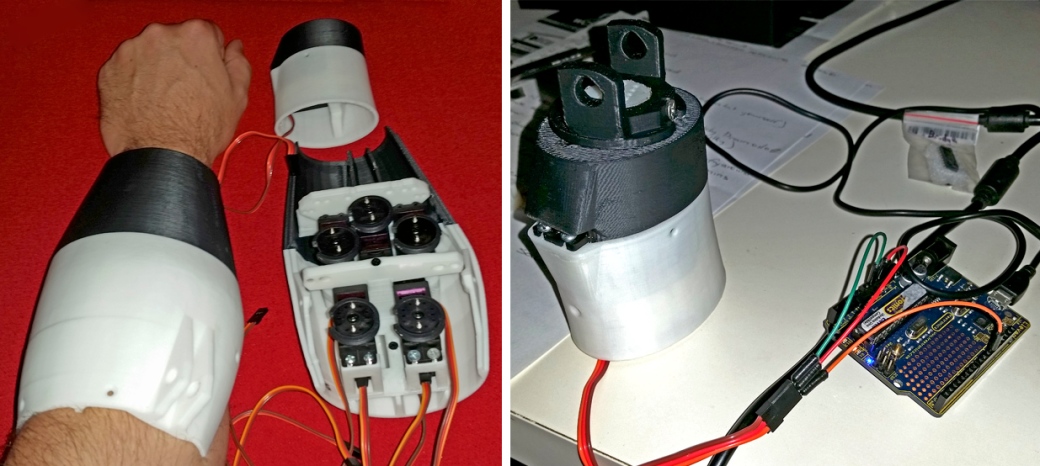
The 6 servo’s needed to build the InMoov robotic arm/hand arrived since my previous InMoov post, and are now installed and working individually. All up they cost about $35AUD on Ebay. The Meshmixer hack for the stands I discussed in the last post also worked quite well, and luckily no other stands to mount the servo’s have needed re-printing – just a few spots of super glue to prevent any minor splitting between the printed layers. This means that most of the assembly of the arm and wrist is now complete, other than running all the lines to control the fingers (a big job I’m not looking forward to). Below is a video of the wrist movement using a MG 996 servo – sounds like it means business!


Nothing particularly exciting just yet, although it’s nice to see the InMoov showing the first signs of life (Frankenstein anyone?). As you can see I’ve connected this servo to an Arduino Uno, and am manually controlling the movements using Grasshopper and Firefly, both plugins for Rhino 3D CAD software. I’m not sure if any other InMoov makers have done this, but if you’ve followed my blog for a while you’ve probably seen previous demonstrations of how you can use what is essentially a 3D CAD program to control the Arduino in real-time, something I’m very excited about. I certainly aim to continue using this visual programming language (VPL) to interact with the arm, perhaps making it more intuitive and interactive to control. Next step: 3D printing the fingers.

– Posted by James Novak

InMoov Robot Hand First Prints

20160812_InMoov 3D Prints

If you’re already following my Instagram you’ve had a sneak peek at one of my side projects – to build the arm/hand for the InMoov robot. No small project! InMoov is the world’s first open-source 3D printable life-size robot, and you can find some excellent instructions and all the files on the InMoov website, a fantastic credit to Gael Langevin the creator of this robot.

Above you can see the first 3D prints I’ve completed for the arm, all printable even on the small print bed of the UP Plus 2. Some of the prints are also done on my Cocoon Create. At a guess it’s taken about 25-30 hours of print time to get the parts shown above, and there are still plenty more to go, so this isn’t a project for the feint of heart. But it is a great challenge that combines 3D printing with electronics and some understanding of mechanics, like an advanced version of Lego.

20160814 InMoov Details

There are other similar open-source projects out there, such as Open Bionics or e-NABLE, but I chose the InMoov because the instructions seem really clear and detailed (very important for a build like this!), and there is a good level of complexity in the movements of the hand. Check out this video to see some of the movements. Hopefully once I get the hand up and running I can have a play around with the design and the method of controlling the hand, but for now it’s just about getting the hand built and working. Keep an eye out for the progress, hopefully with some of the electronics installed once the servo’s arrive from China.

– Posted by James Novak

Documenting Arduino Experiments

150514 FritzingOver recent months I’ve experimented with so many open source tools including Arduino, Processing, MeshLab, and FreeCAD. The latest one on my list is called Fritzing, and with many of my recent posts featuring experiments with Arduino (or specifically the Freetronics Eleven), this is a fantastic tool to begin clearly documenting the schematics of these.

Fritzing includes a library of standard electronic components, along with of course Arduino boards and blank breadboards, replicating the physical hardware in a graphical ‘sketch.’ It’s a simple matter of dragging and dropping components, and then drawing wires to connect everything together. In a matter of seconds you have a clear record of your layout to come back to at any time. The images above start with a photograph of the simple potentiometer circuit I used for a previous post combining the Arduino + Rhino + Grasshopper + Firefly, followed by a diagram from Fritzing (called ‘breadboard’ view), and finally another automatically generated view of the schematic. That’s the great thing about Fritzing – everything you do in one view translates across to all the others. You can even design your own PCB’s from scratch ready for manufacture!

It also looks like there is a section to add your Arduino code and upload directly, although according to the website this is a new experimental feature. But looking into the future it seems a fantastic tool to combine everything you need to both program and digitally test your project in one place, along with just sharing your design with others. I’ll use this for any future posts detailing Arduino experiments so you can also replicate them easily, or at least understand what’s been done.

– Posted by James Novak

Open Design – What’s it All About?

OpenDesignNow-01It’s not my intention to use this blog as a promotional site for products or services, but simply to share my own experiences and projects that hopefully inspire those of you interested in 3D printing. However sometimes something comes along that really needs to be shared – in this case, a publication called ‘Open Design Now: Why Design Cannot Remain Exclusive.’ Originally released as a book, in the interests of open-source, the complete book is now available free from their website – just click here to check it out.

I’ve only read the first 2 articles so far, but they really get into the nitty gritty of what it means to be a designer in this digital age of 3D printing and Creative-Commons file sharing. If you follow this blog you’ll know that I’ve shared plenty of my own original designs through Thingiverse (check them out here), and am finding my own research interests turn towards what it really means to share a design without any financial return. Why do we do it? What’s the benefit? Who has access to your design, and what will they do with it? While this book may answer some questions, it certainly will leave you asking many more questions of yourself.

If you read any of the articles, you’re welcome to use the comment section to let me know what you think 🙂

– Posted by James Novak