X-Men Cyclops Goggles – COMPLETE

20150717 Cyclops Goggles

As featured on Pinshape’s ‘Pick of the Week

After what seems like months, finally I’ve found time to photograph and share my X-Men Cyclops goggles, which I created for a costume party. You can catch up with the journey in my last post 3D printing them, or the first one designing them by clicking the links. You can also download these exclusively from Pinshape – just click here! [**2022 update – now available for free direct from me**]

For the first time, because of the work involved in creating these, and the fact I just think they’re really cool, I’ve put a small price on these at $4.97 to download. To date I’ve given all my models away for free, but at some point it’s important to give value to a design. I’m not interested in making money on these, just to add a sense of value for the time and effort involved in creating something like this, which is designed to print on a small desktop 3D printer like my Up! Plus 2 in 4 pieces. I have designed in special locators to make assembling and gluing very easy, and also nice and strong.

20150718 Cyclops Novak

If you have a close look at the design you will probably notice a few interesting things:

  1. The smooth surface finish. This was achieved by spraying multiple coats of a putty undercoat and sanding back to remove the ‘layered’ effect. A final colour was then sprayed on top, with the black details painted by hand. You can see how the layers stood out when the first undercoat was applied in the image below – often these are much less noticeable in the white ABS plastic!
  2. The red visor is not 3D printed – it was cut from a folder and is translucent enough to see out of.
  3. LED’s – yes everything’s better with LED’s! While only glued on roughly, at night, and at the party, they looked pretty awesome (although I felt pretty weird after seeing nothing but red while wearing them!).
  4. Foam was glued into the ear pieces to create a firm fit. As mentioned in my first post designing these, I used a previous 3D scan of my face to get the dimensions right – however knowing that I wanted to share them on a site like Pinshape, I kept the design simple in its details so that it could fit anyone. Obviously we all have differently-shaped heads, so it’s never going to be perfect for everyone, so tweaking the print with something like foam might be necessary. You might also need to scale the print depending on your head size – the critical dimensions are on Pinshape.

2015-07-07 16.15.48 smallOverall this is a really fun design that I hope a few people get some enjoyment from making. Cyclops isn’t the most exciting character in recent movies, but as a kid, I loved watching the cartoon version where he wore these style of goggles. Bring back that version of Cyclops I say! If you make these and wear them to a convention or party, please post images on Pinshape so I can check them out!

– Posted by James Novak

Marvin the Martian Ray Gun – COMPLETE

20150717 Marvin Ray Gun

Finally, here it is! This is my version of Marvin the Martian’s Ray Gun from Looney Tunes, 3D printed as a prop for a costume. You can look back at the process of 3D printing and CAD modeling the design in my previous posts by clicking on the links. You can also download the files needed to 3D print your own for free from both Pinshape or Thingiverse depending on your platform of choice. I’m just that generous 😉

This definitely turned into a bigger job than expected with the size and quantity of parts required taking approximately 20 hours to print on my Up! Plus 2 printer. However by far the most challenging aspect was getting the glue and paint to dry in the hours before it was needed for the costume party! With it being the middle of winter, things just didn’t happen the way I expected, and I ended up using tape and clamps to hold things in place in front of a small heater right up until walking out of the door to the party. Note to self: don’t use super glue on paint that is still tacky, it just doesn’t work!

2015-07-07 16.15.15As you can see in this image, the surface flaws and layers really became obvious as soon as the undercoat went on. I instead bought a spray putty, applying about 3 coats to most of the parts before sanding them back to get a relatively smooth finish. A couple of the pieces even needed some filler just to hide some holes left from peeling away support or lifting slightly off the print plate, causing gaps when the pieces came together. Thankfully I had a helper on this one while I was busy performing the same process to my X-Men Cyclops goggles (which may be my next blog post – but you can see what they looked like just after printing in a previous post).

All-in-all a bit of fun, and great to add some novelty by having the moving trigger and dial on the back that determines the size of the KABOOM! Make sure you wedge these pieces into the body before gluing to achieve this movement – the exploded view of the parts in on both Pinshape and Thingiverse to see how it all comes together. Enjoy and remember, this is just a prop (we all know ‘3D printed guns‘ can cause a bit of a stir)!

– Posted by James Novak

Marvin the Martian Ray Gun – Part 2

2015-07-07 Ray Gun

Before anyone freaks out, NO THIS IS NOT A 3D PRINTED GUN!!

Well it sort of is, but only a toy modeled off Marvin the Martian’s Ray Gun for a costume. You can read about the design of it in my previous post. It’s taken a while to print all the pieces, approximately 20 hours on my Up! Plus 2, but I’ve finally started gluing some of the pieces together ready to paint (a few pieces already glued in the images above). I experimented a bit with different print orientations, trying to minimise any support material in contact with outside visual surfaces, and some worked better than others. Unfortunately some pieces will require a bit of manual finishing with filler and sanding to make presentable, but overall it’s turned out pretty cool. For the shells of the main body it turned out that the orientation shown in the image above worked best, both in terms of print time and minimal surface issues. Also the moving parts (trigger and dial) fit well so it should be a good result.

I’m simultaneously going to be painting my own X-Men Cyclops goggles, so a lot of work ahead sanding and painting!

– Posted by James Novak

Cyclops – Step 2

2015-07-01 Cyclops “Don’t anybody move!… I lost my contact lens.”

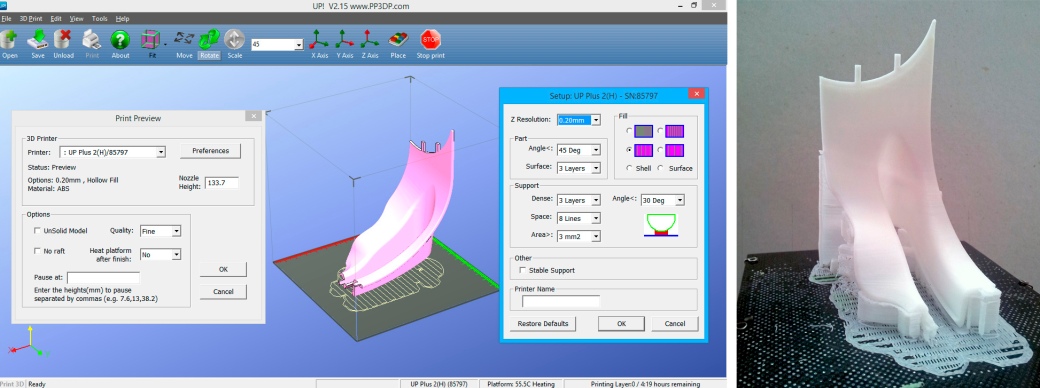
OK so here it is, I’ve finished 3D printing the 4 pieces of my X-Men Cyclops goggles (read about my initial design of them here) and glued them together with superglue. Pretty cool if I do say so myself! You can see the settings I used on my Up! Plus 2 printer below – I kept things nice and slow to minimise print errors (an ongoing problem with my printer that can result in the print shifting or skipping – see my previous post on this issue). As a result, the ear pieces took 5 hours each, and the lens pieces 4.5 hours each, resulting in a total print time of 19 hours. Of course this could be cut down quite a lot depending on the settings of your own printer and the layer thickness you end up using.

150702 CyclopsNow that the glue is drying my next steps will be to prime and sand the goggles ready to spray paint. I don’t know yet how much effort I’m going to put into smoothing the visible layers, I’ll work it out once I start getting my hands dirty and see what they look like. Perhaps a bit of acetone prior to painting will work (see my previous results with acetone) or just a few steps of spraying undercoat and sanding. The pieces have aligned very well using the locating notches I designed into them, just some very minor differences in surfaces where the lenses come together in the middle. Should be relatively easy to clean up with some sanding.

Overall the fit is pretty close, once the glue dries completely I’ll get a better idea of whether a little bit of padding might be needed either in the nose area or around the ears to keep them securely in place. I also need to still figure out how I’m going to add the lens and some sort of lighting effect – if you’re going to make something, you may as well go all out!

– Posted by James Novak

Marvin the Martian Ray Gun – Part 1

150625 Ray GunFunnily enough this is my second post in a row for a part of a costume! Although this time not for me (I’ve now started 3D printing my Cyclops goggles from X-Men which you can read about the design of here), this is Marvin the Martian’s ray gun which I’ve designed ready to 3D print. Again like the Cyclops goggles, I wasn’t able to find a nice 3D model ready to download and print, so have spent the afternoon in Solidworks creating my own, and cutting it into sections suitable for the small print plate of my Up! Plus 2 printer.

marvin002In total I’ve ended up with 9 pieces, including a moving trigger and dial feature to add an extra bit of realism to the model. These will be held in place simply by pinning them within the 2 main body pieces when glued together. I’ve also made sure to add some simple locating holes and notches to help align everything together for the gluing process. The aim is to post this design to Thingiverse as well once completed and tested, and hopefully some of you will make use of it, either as is, or remixed into something else. Stay tuned for upcoming posts showing the printing, gluing and painting of both this ray gun and of course the Cyclops goggles.

– Posted by James Novak

Cyclops – Step 1

150623 Cyclops

With a costume party fast approaching I couldn’t turn up without at least some part of my outfit 3D printed could I? Originally I had planned to go as Thomas from Daft Punk after finding the helmet files on Thingiverse, however this is a seriously involved 3D print with around 30 pieces to print, glue, smooth, paint and install electronics! As much as this would be an awesome project, I can’t really justify that amount of time, and probably wouldn’t finish it in time anyway. Searching for something smaller, Cyclops from X-Men became my next option – I’ve never been a fan of the movie version played by James Marsden, but growing up watching the cartoon version he was always my favourite. The best image I could find of the goggles is on the left.

A quick look on Thingiverse didn’t bring up anything that really looked any good, so today’s job has been to model the trademark goggles worn by Cyclops (not the lame looking sunglasses!). I’ve previously had a 3D scan of my face done, and used it to build a perfect-fitting Virtual Reality headset – this seemed like a great starting point to get the dimensions correct. Originally I was going to make these goggles fit perfectly as well, using the surfaces of the 3D scan to shape them. However I’d like to share this design on Thingiverse, and doubt there are too many clones of me out there who would fit it! So I’ve just used the scan to get the sizing correct for my face, and kept the geometry much more generic so that it should suit most people, perhaps with some scaling to shrink/enlarge it for different head shapes. You can see how I’ve modeled half of the design in Solidworks in the right image, with the biggest challenge being to get the eye-slot in the right spot and the rest of the geometry proportional around this. The slot is quite narrow so it needs to be correct or I won’t be seeing very much!

150624 Cyclops

I have sliced the model up into 4 sections so that it can be printed on the small print plate of my Up! Plus 2 3D printer – notice the small slots I’ve added to allow for easy alignment and gluing. Now just to print, glue, paint, and figure out how to achieve the red eye-piece and light it up. Once that’s all done and I know it works (fingers crossed!) I’ll upload it to Thingiverse 🙂

– Posted by James Novak