3D Printed Toys with Moving Parts

My desk is covered with 3D prints, some of them my own designs, and others are just cool examples of what can be done with a home 3D printer. This is one of those examples.

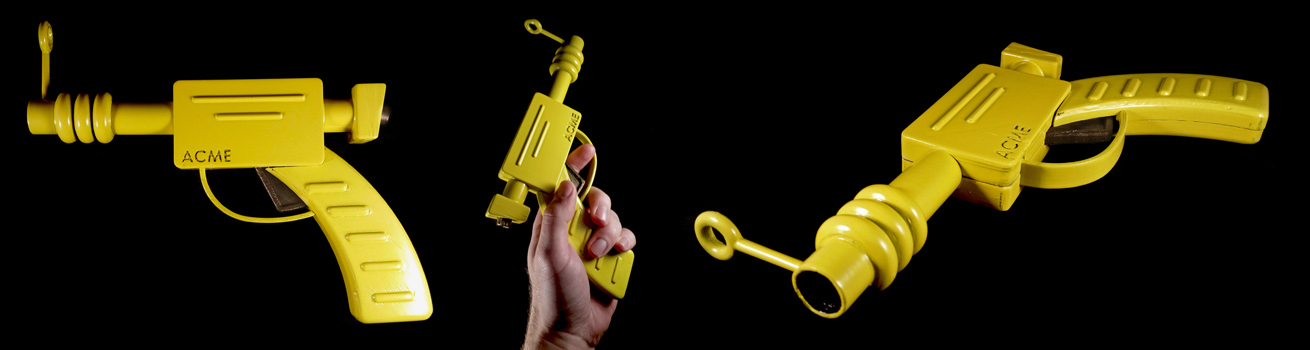
Stian Ervik Wahlvaag (@agepbiz) has created a clever range of 3D printed vehicles known as “Tiny Surprise Eggs” – why? Well, because they fit within an egg of course! The unique feature of each toy (and egg) is that they feature moving parts printed in place, without the need for any support material. Once the toy is taken off the printer, it is ready to go. The example pictured above is “Surprise Egg #7 – Tiny Car Carrier” and all the vehicle wheels rotate, and the car carrier itself can raise and lower the ramps.

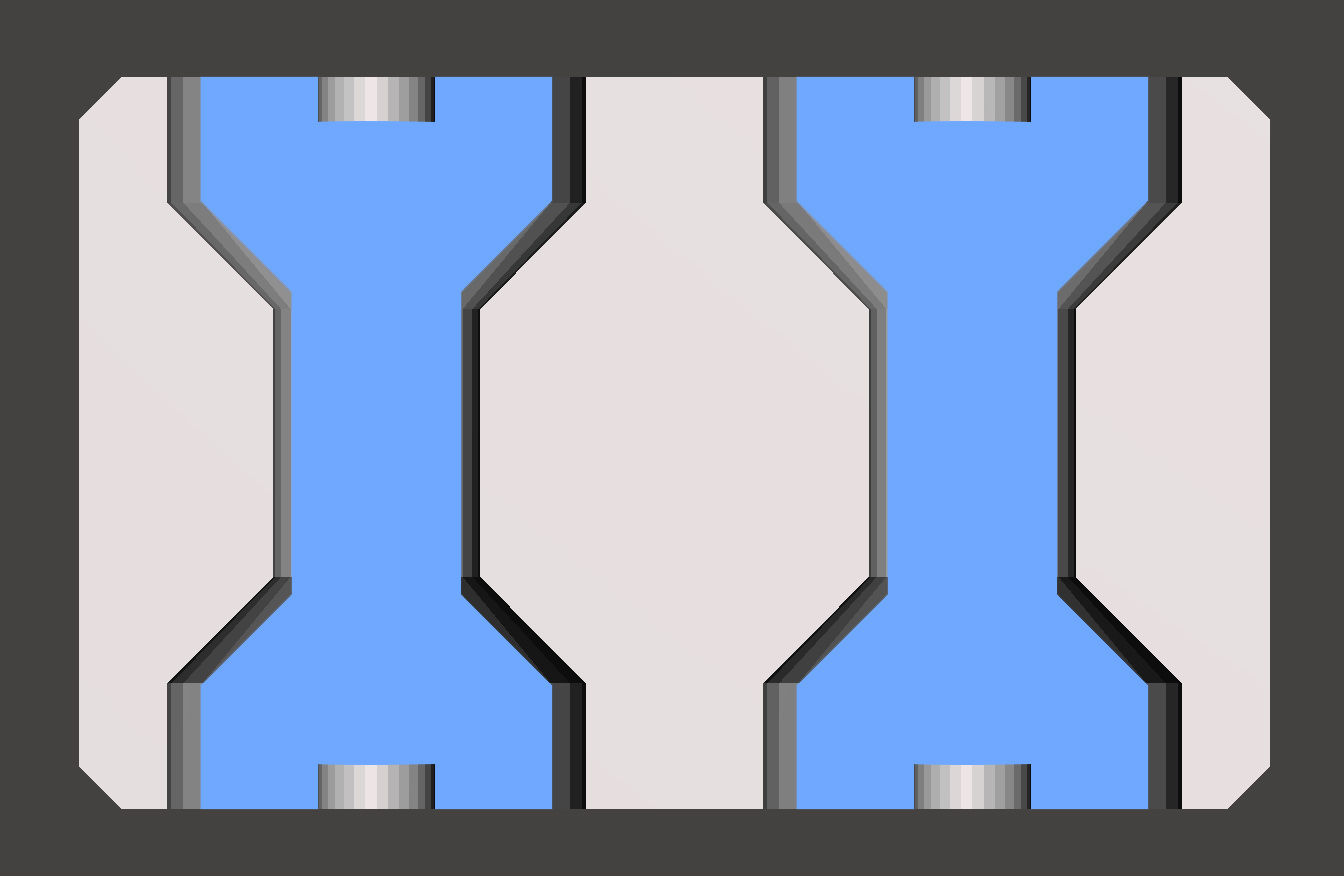
While I didn’t print the egg, I did scale these prints up 200% to have something a little bit more child-friendly. Unfortunately I enjoy them so much they have permanently stayed on my desk, but I promise I’ll print my son another set! The moving parts still work really well at this increased scale and provide some clever design tricks to ensure multiple parts can be printed as an assembly. As an example, above is a cross section through one of the cars showing how the wheels and axels are designed within the main body of the car. Some simple angled details mean that no support material is needed when printed in this orientation, yet from the outside the car just looks like it has normal cylindrical wheels. Great example of how to design for additive manufacturing (DfAM) as it’s known.

Following the vehicle carrier, I’ve also 3D printed “Surprise Egg # 6 – Tiny Jet Fighter” which features wings which fold out, again at 200% scale and with no support material. Both of these designs, as well as at least 8 more surprise egg vehicles, are free to download from Thingiverse, and highly recommended as a way to test your print settings (if there are any issues the moving parts may end up fused together), and learn a few of the tricks for designing assemblies for 3D printing.

If you print these yourself, or have any other recommended prints that include clever design details like moving parts, please share them in the comments section.

– Posted by James Novak

#3DBenchy, the Most Downloaded 3D Print

20180914_3DBenchy

If you are involved in 3D printing there’s no doubt you’ve at least heard of #3DBenchy, if not printed one, or two, or even more. What is #3DBenchy? Well, it’s a tug boat of course! But more than that, #3DBenchy has become like the “Hello World!” from coding, the go to 3D model to test out a new printer or setting. Why a tug boat? That’s a very good question, and the only real explanation is that it includes a number of features that challenge a printer including overhangs (e.g. roof) and a variety of angled surfaces. Also, it’s a little more interesting than a basic calibration cube or set of test prints.

#3DBenchy was developed by a company called Creative Tools, initially as an in-house calibration test for their own printers. On April 9th 2015, Creative Tools uploaded the design to Thingiverse for anyone to download for free, and the rest, as they say, is history. Since then the file has been downloaded over 600,000 times from Thingiverse alone, and can be found on pretty much any other 3D file sharing website. #3DBenchy even has its own website, Instagram profile, and Twitter account – talk about a famous 3D print!

I’ve never seen any need to jump on board the #3DBenchy bandwagon, however, I was recently writing up some research that required me to photograph a #3DBenchy, and I’m always up for an excuse to print something new. So here we are, #3DBenchy in hand, and given I used some relatively fast settings to get it printed in about 1 hour, I think the result is quite good. This one is the original #3DBenchy at full scale, printed without support. And of course my photos have been fed back onto Thingiverse as one of the 2788 makes of #3DBenchy, and one of 2961 posts on Instagram… and counting. Vive la révolution!

– Posted by James Novak

Marvin the Martian Ray Gun – COMPLETE

20150717 Marvin Ray Gun

Finally, here it is! This is my version of Marvin the Martian’s Ray Gun from Looney Tunes, 3D printed as a prop for a costume. You can look back at the process of 3D printing and CAD modeling the design in my previous posts by clicking on the links. You can also download the files needed to 3D print your own for free from both Pinshape or Thingiverse depending on your platform of choice. I’m just that generous 😉

This definitely turned into a bigger job than expected with the size and quantity of parts required taking approximately 20 hours to print on my Up! Plus 2 printer. However by far the most challenging aspect was getting the glue and paint to dry in the hours before it was needed for the costume party! With it being the middle of winter, things just didn’t happen the way I expected, and I ended up using tape and clamps to hold things in place in front of a small heater right up until walking out of the door to the party. Note to self: don’t use super glue on paint that is still tacky, it just doesn’t work!

2015-07-07 16.15.15As you can see in this image, the surface flaws and layers really became obvious as soon as the undercoat went on. I instead bought a spray putty, applying about 3 coats to most of the parts before sanding them back to get a relatively smooth finish. A couple of the pieces even needed some filler just to hide some holes left from peeling away support or lifting slightly off the print plate, causing gaps when the pieces came together. Thankfully I had a helper on this one while I was busy performing the same process to my X-Men Cyclops goggles (which may be my next blog post – but you can see what they looked like just after printing in a previous post).

All-in-all a bit of fun, and great to add some novelty by having the moving trigger and dial on the back that determines the size of the KABOOM! Make sure you wedge these pieces into the body before gluing to achieve this movement – the exploded view of the parts in on both Pinshape and Thingiverse to see how it all comes together. Enjoy and remember, this is just a prop (we all know ‘3D printed guns‘ can cause a bit of a stir)!

– Posted by James Novak

Low Poly Fox from Pinshape

20150802 Low Poly Fox

This is a simple design downloaded from Pinshape of a low-poly fox (or cat), created by @steven_dakh. He has a whole range of different animals created in this low-poly style, and I needed something to run on a printer during one of my 3D printing workshops to both show how the printers work, and also talk a bit about resolution and STL’s. Also it’s always nice to print something new rather than my own designs, and introduce some new people to the world of 3D printing and 3D printing communities like Pinshape!

This model printed in 1:47 on an Up! Plus 2 printer using the 0.2mm layer thickness, and required no support material which is always great. I also scaled it down from the original which is quite big. There’s not much more that I can say on this one, just a simple print that can now be given as a gift to someone who loves cats (yes this relates back to a previous 3D printed cat I made!).

Note: like me, @steven_dakh is also on Thingiverse and you can download the design here if Thingiverse is your community of choice.

– Posted by James Novak

Marvin the Martian Ray Gun – Part 2

2015-07-07 Ray Gun

Before anyone freaks out, NO THIS IS NOT A 3D PRINTED GUN!!

Well it sort of is, but only a toy modeled off Marvin the Martian’s Ray Gun for a costume. You can read about the design of it in my previous post. It’s taken a while to print all the pieces, approximately 20 hours on my Up! Plus 2, but I’ve finally started gluing some of the pieces together ready to paint (a few pieces already glued in the images above). I experimented a bit with different print orientations, trying to minimise any support material in contact with outside visual surfaces, and some worked better than others. Unfortunately some pieces will require a bit of manual finishing with filler and sanding to make presentable, but overall it’s turned out pretty cool. For the shells of the main body it turned out that the orientation shown in the image above worked best, both in terms of print time and minimal surface issues. Also the moving parts (trigger and dial) fit well so it should be a good result.

I’m simultaneously going to be painting my own X-Men Cyclops goggles, so a lot of work ahead sanding and painting!

– Posted by James Novak

Marvin the Martian Ray Gun – Part 1

150625 Ray GunFunnily enough this is my second post in a row for a part of a costume! Although this time not for me (I’ve now started 3D printing my Cyclops goggles from X-Men which you can read about the design of here), this is Marvin the Martian’s ray gun which I’ve designed ready to 3D print. Again like the Cyclops goggles, I wasn’t able to find a nice 3D model ready to download and print, so have spent the afternoon in Solidworks creating my own, and cutting it into sections suitable for the small print plate of my Up! Plus 2 printer.

marvin002In total I’ve ended up with 9 pieces, including a moving trigger and dial feature to add an extra bit of realism to the model. These will be held in place simply by pinning them within the 2 main body pieces when glued together. I’ve also made sure to add some simple locating holes and notches to help align everything together for the gluing process. The aim is to post this design to Thingiverse as well once completed and tested, and hopefully some of you will make use of it, either as is, or remixed into something else. Stay tuned for upcoming posts showing the printing, gluing and painting of both this ray gun and of course the Cyclops goggles.

– Posted by James Novak